[MAGIC-L3 Prime] How to use the L3 Prime
Contents
- 1. Marking Process
- 2. Ring Marking
- 3. Bangle Marking
- 4. Photo Marking
- 5. Cutting Process
- 6. Curved Materials Marking
- 7. Shape Distortion
- 8. Layout of text in a circle
- 9. Layout of text in a curve
- 10. Text Change
- 11. Multi-height auto leveling Marking
- 12. Template Creation
- 13. Saving as design sample
- 14. Auto change of serial number
- 15. Loading and editing image
- 16. Import a file SVG format
1. Marking Process
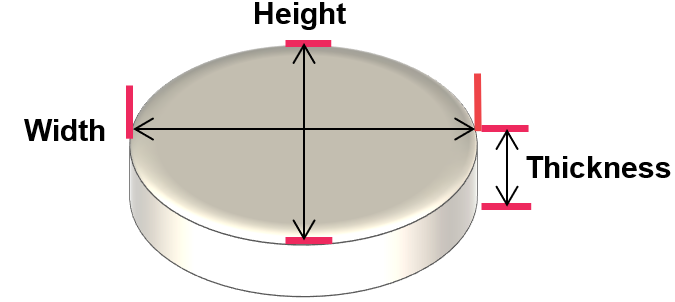
- Measure the size and height of your material.
- Place your material on the work area and set the laser focus using the direction key (Z)

 buttons.
✽Also set the laser focus when using auto focus.
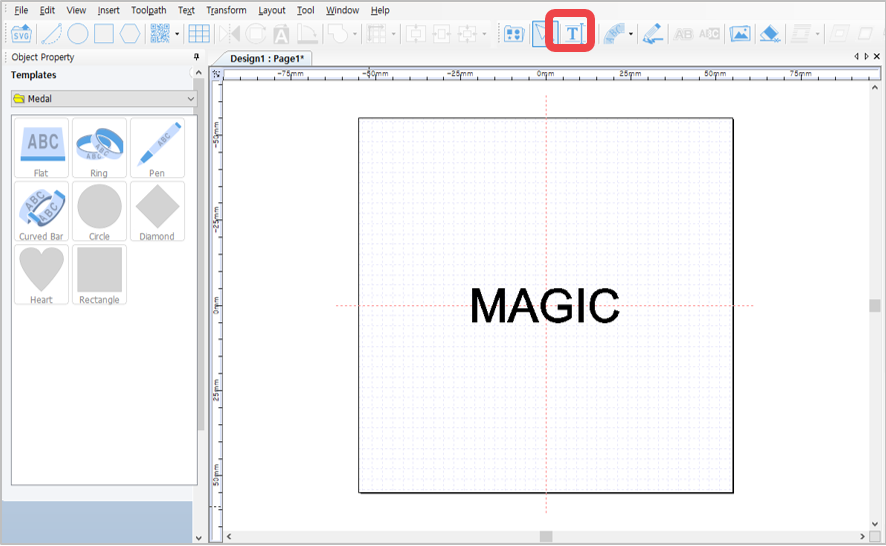
- Create your text design by clicking
 Text input button on the toolbar. Move your mouse and click at any target location on the work area to enter text.
- Edit the size, font and thickness of your text by clicking
 Selection button on the toolbar. To position your text in the center, click
 Center in Page button.
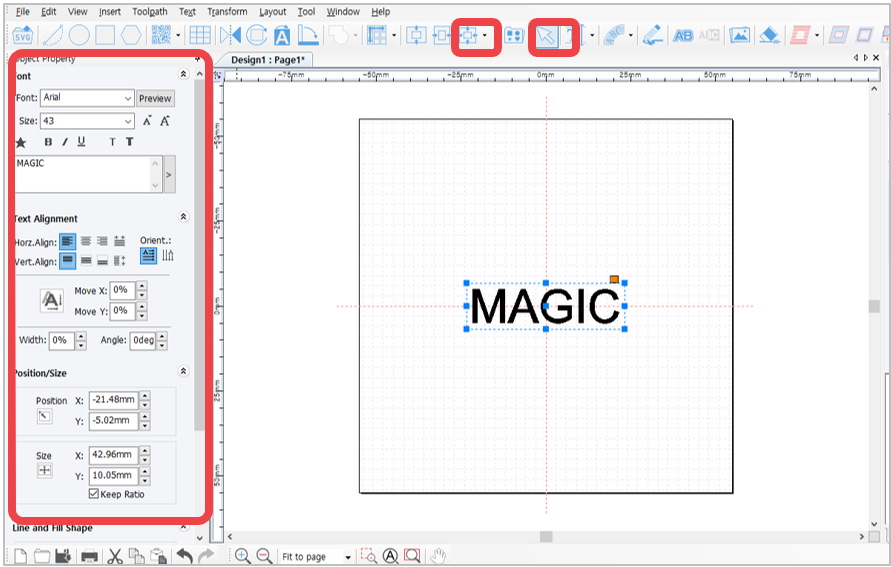
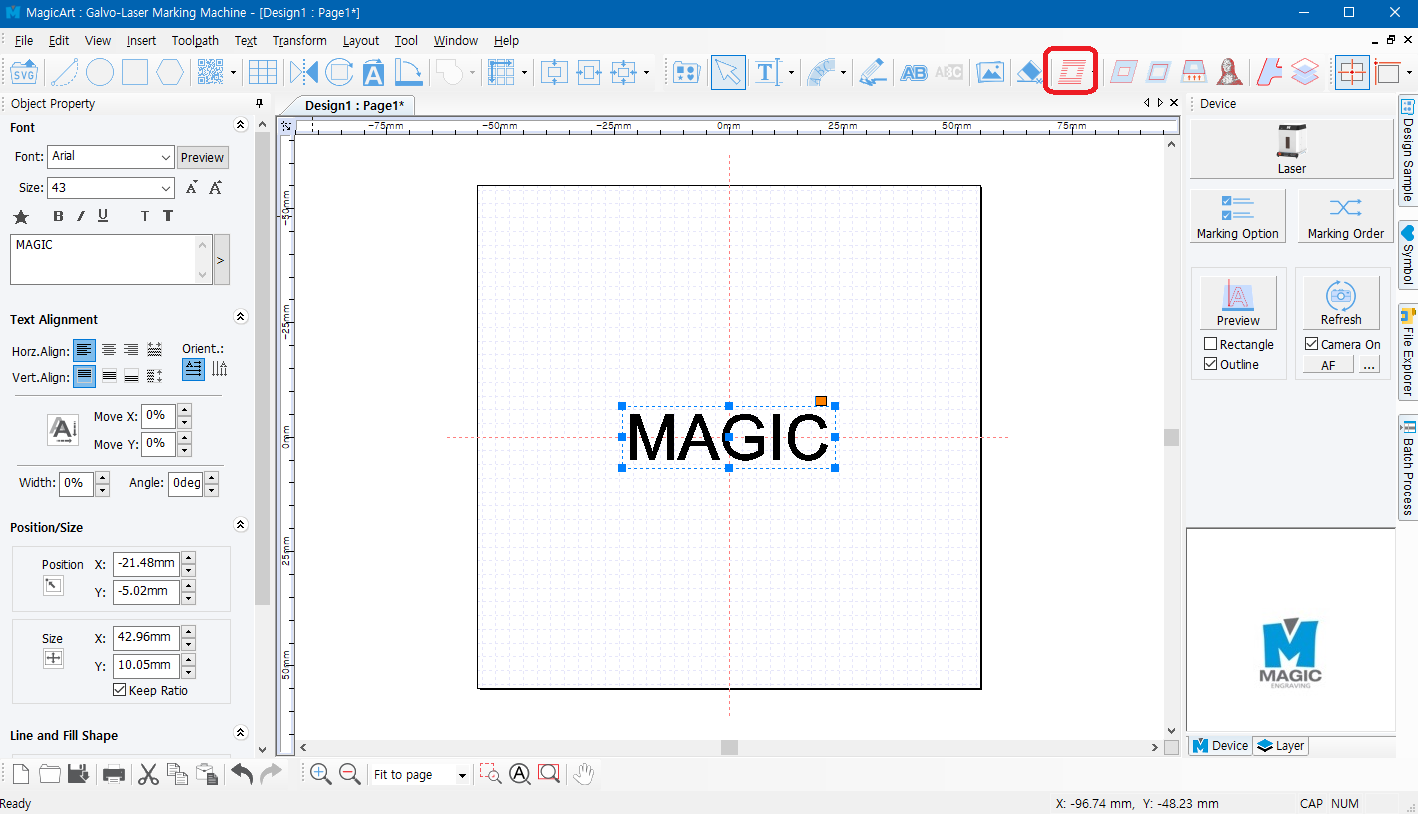
- Upon completing the text design, click
 Scanned Line Toolpath button.
✽ Click button on the top right of the screen for immediate marking without creating a Toolpath.
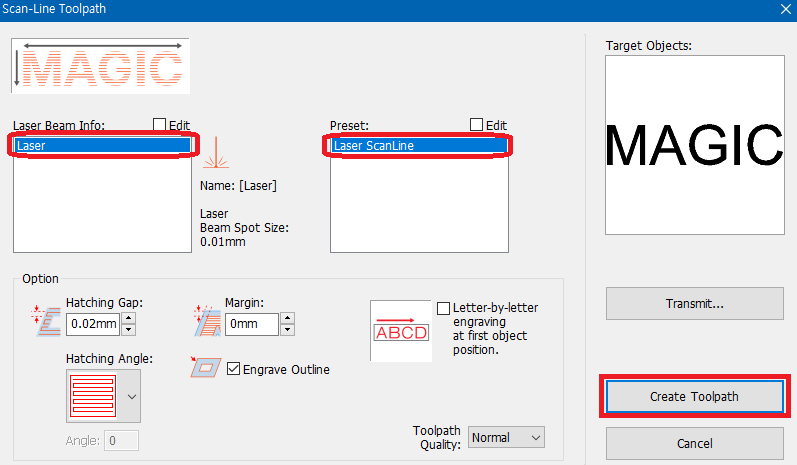
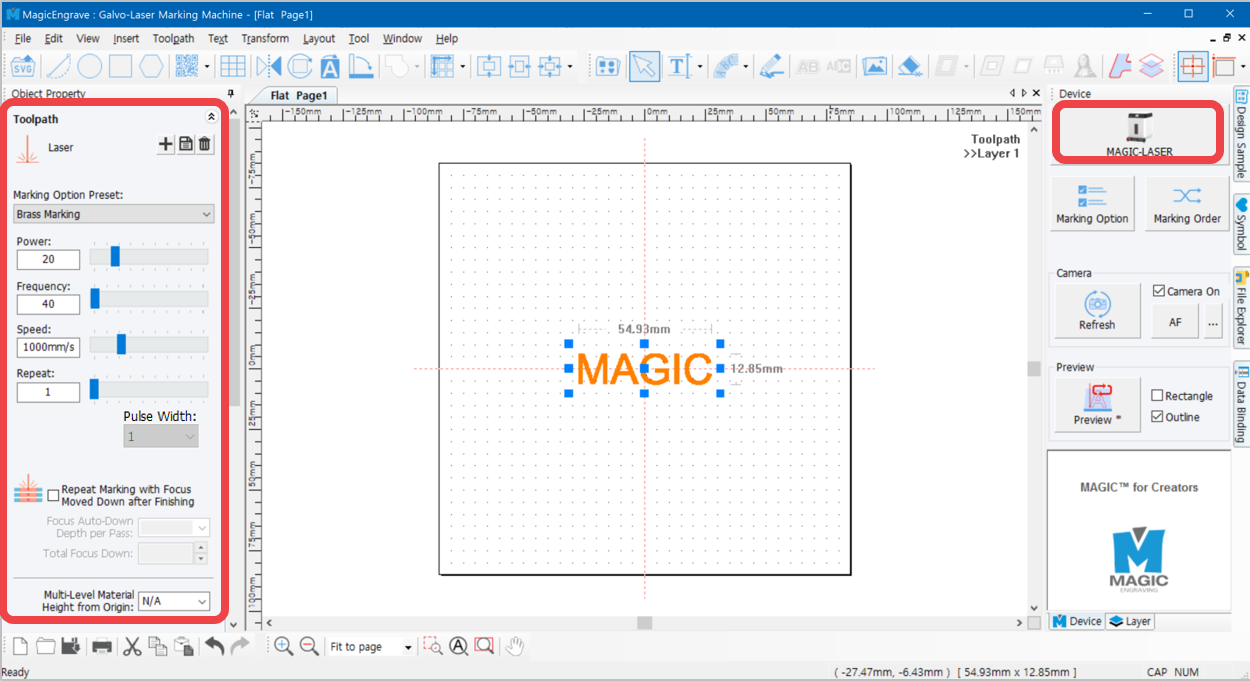
6. Select a marking option in the Toolpath window. Specify the hatching interval (if necessary), then click Create Toolpath.
- After creating the toolpath, set the laser marking option then click button to start marking.
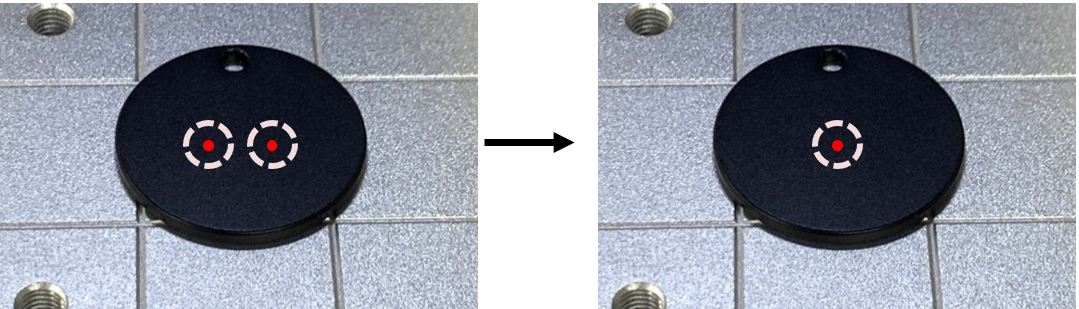
- Once the tool is positioned to the center of the material and the laser pointer turns on, use the direction key buttons to position the laser pointer to the marking area.
The area that the laser pointer points to is where the actual marking takes place.
The round laser pointer in the middle represents the origin of the height of laser focus.
 |
Whenever the direction key is pressed, the laser pointer moves up/down/left/right, showing a marking area.
Check if the marking zone is matched with the area on the material to be actually marked. If unmatched, adjust the position, using the direction keys. The laser pointer automatically points to the area where marking takes place (based on the target location on the work area). When the direction key is pressed, the laser pointer moves to the area to be marked (left, top, right or bottom) from its target location. If the marking area needs to be adjusted to the left, press  key to move the pointer to the left. 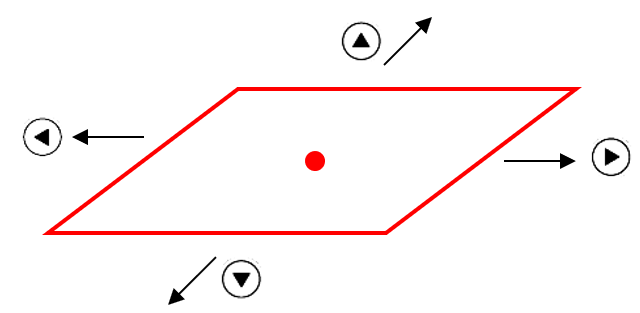 |
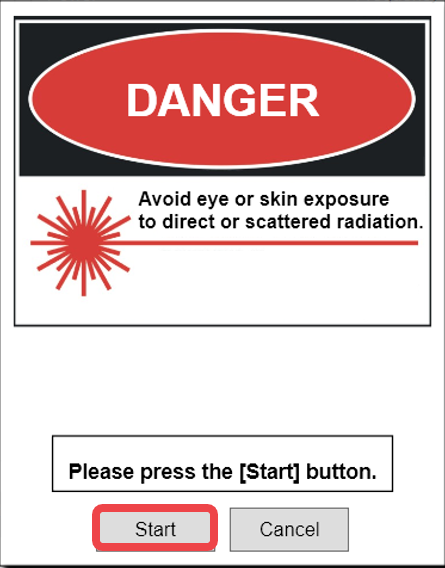
- After positioning the laser pointer and determining the location of the marking area, click Start button on the program or long-press
 button on the machine (for more than 2 seconds) until the cover closes and the marking process begins.
· Repeat marking: Press and hold button to complete marking, then double-click button to repeat marking on the same material.
2. Ring Marking
1) Ring Marking
When marking on the inside of a ring, marking beyond the angle of 20° may not be possible.
Take note that it may not be possible to mark beyond the suggested angle and marking position.
Secure the material
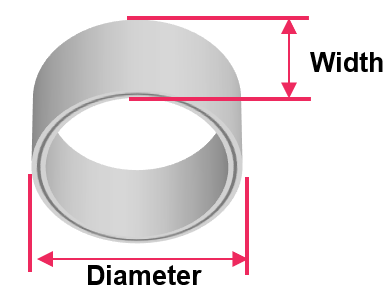
- Measure the width and diameter of the ring.
 |
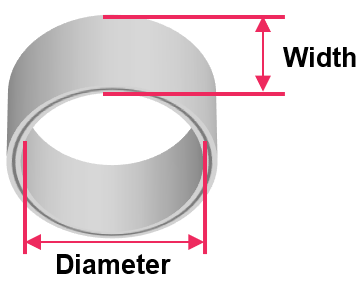 |
| Outer marking – Ring outside size | Inner marking – Ring inside size |
- Place the ring properly on the clamp then use the direction key (Z) buttons to set the laser focus.
L type clamp
※L type clamp is sold separately.
Adjust the angle by turning the fixing knob to the left. Once the angle is adjusted, turn the fixing knob to the right to secure the angle in place.
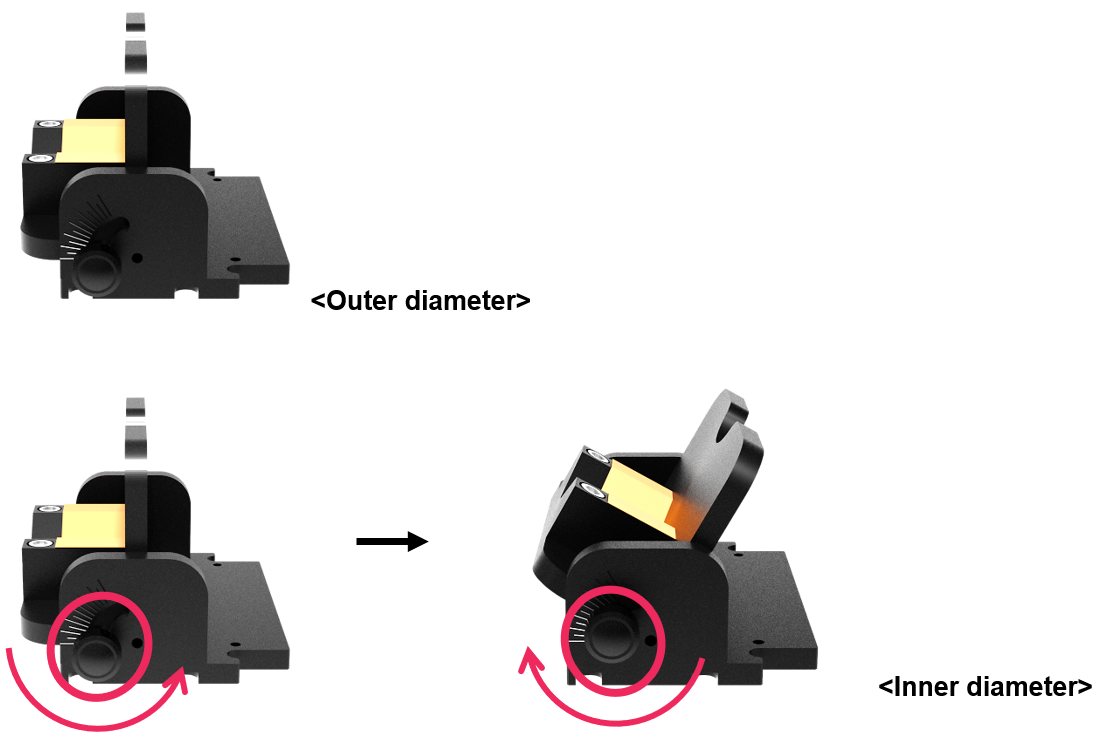
Rotary Clamp
※Rotary clamp is sold separately.
When marking with a rotary clamp, the material or the clamp itself may sometimes get in the path of the focus pointer or may block the focus pointer. If this happens, use a guide laser as a third focus pointer. L3 has a guide laser available that act as a third focus pointer when the focus pointer is blocked.
Press and hold the Brightness Adjustment button for 2 seconds to activate the third focus pointer.
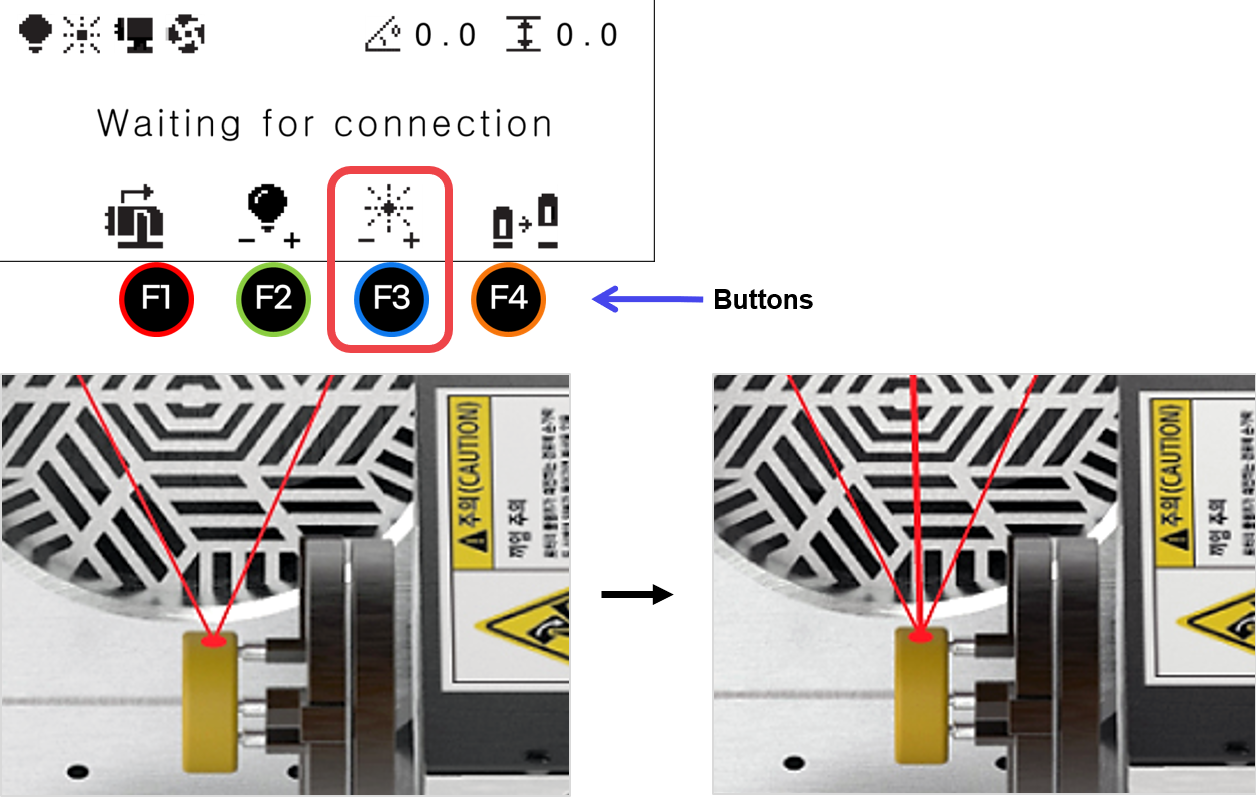
Object position
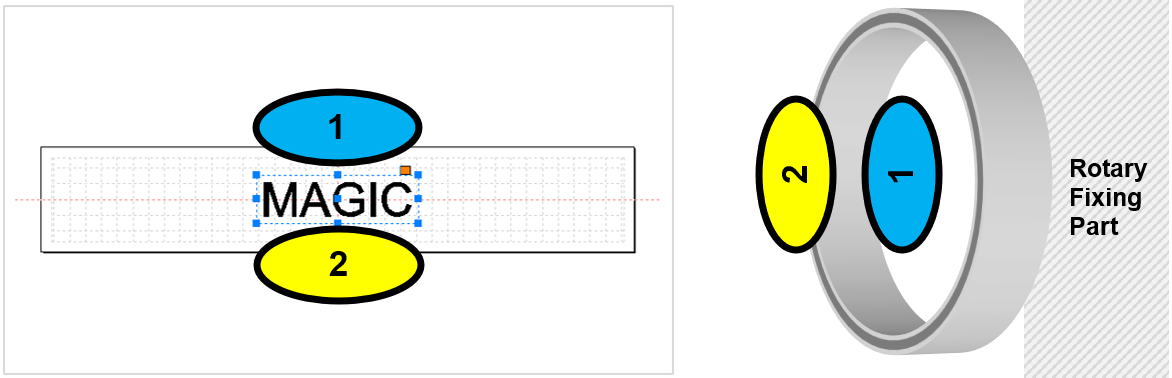
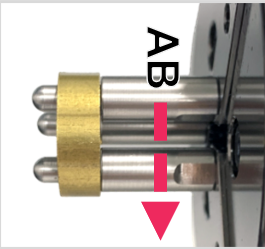
Engraving direction
The direction of the characters to be engraved on the ring is shown in the picture below. Check the target location (where you want your characters to be engraved on the ring) then firmly secure the ring.
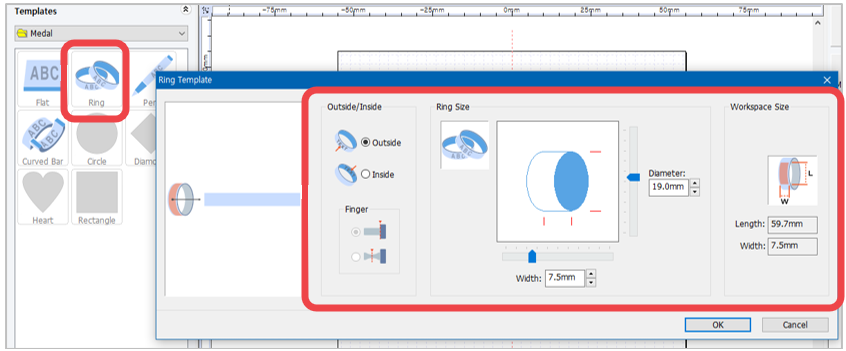
- Double-click “Ring” template in the object property window. When Insert Rotary Object Template window appears, select one marking option: outside or inside. Then enter the width and diameter of the ring and click “OK.”
Adding text objects and toolpaths
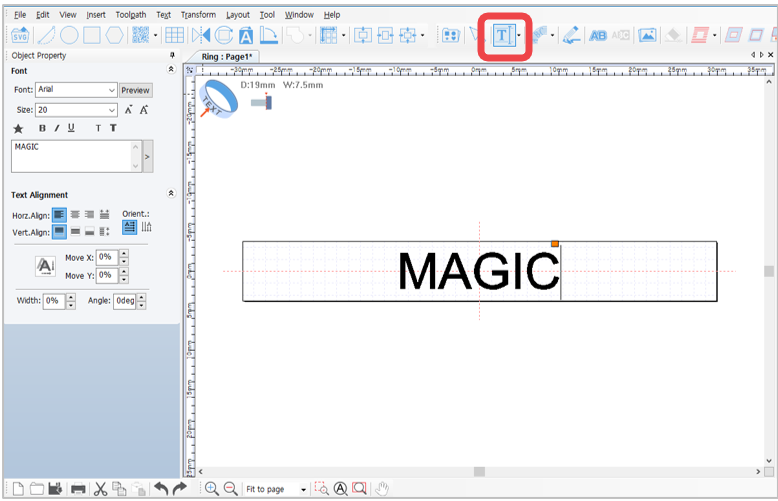
- The template will appear at the center of the screen. Select Text Input on the toolbar then click at any target area on the work area to enter the text to mark.
- After entering the text, click Selection on the toolbar to enter the object selection mode. Select the text, then edit its size and font. To place the text at the center of the work area, click Center in Page button.
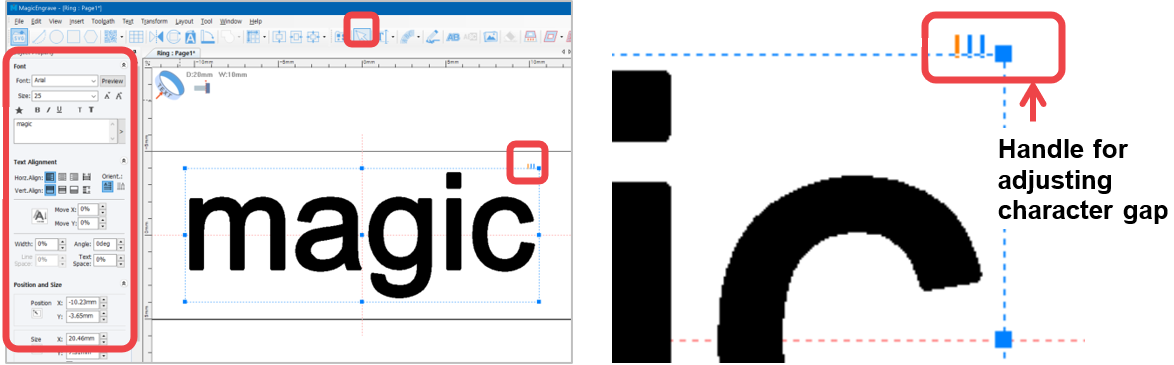
What is Handle for adjusting gaps between characters?
Handle for adjusting gaps between characters is a function that adjusts gaps between characters by dragging characters to target positions.
- Upon completing the design, click Scanned line Toolpath button. A Toolpath refers to a path way of tools.
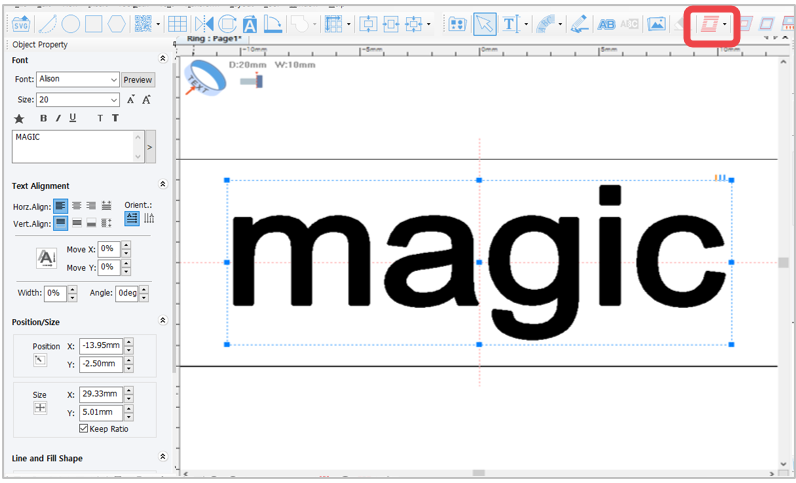
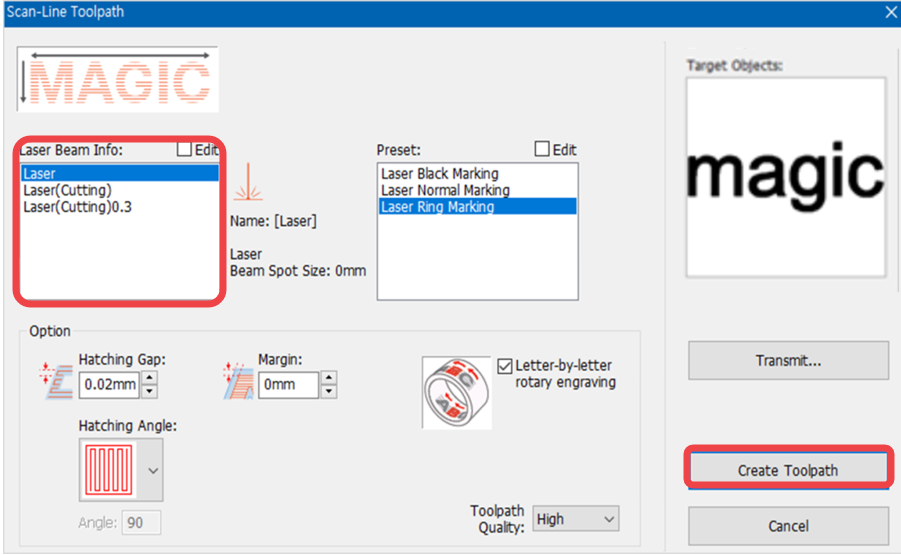
- The “Scanned line toolpath” window will appear (as shown in the picture below). Select the tool, toolpath gap and depth then click “Create Toolpath” button.
-Letter-by-letter rotary engraving: Engrave the each text at fixed angle when rotary marking (Text marking only)
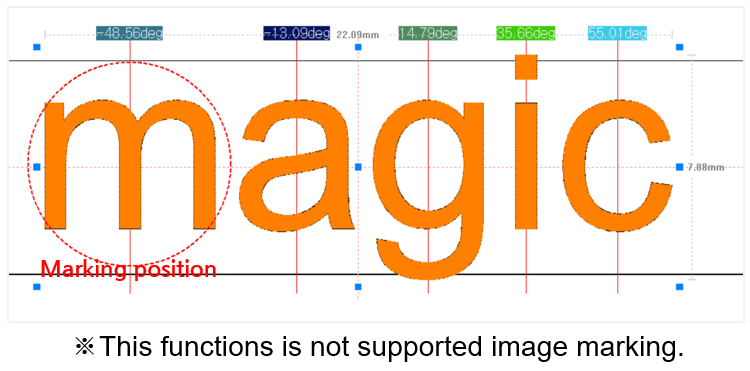
- The “Toolpath” object is created with red lines marked or filled on each text (as shown in the picture below). Scroll up the mouse wheel to zoom in the image of the toolpath object to check the line style. You may delete the toolpath object and create a new one if the toolpath is not your preferred style.
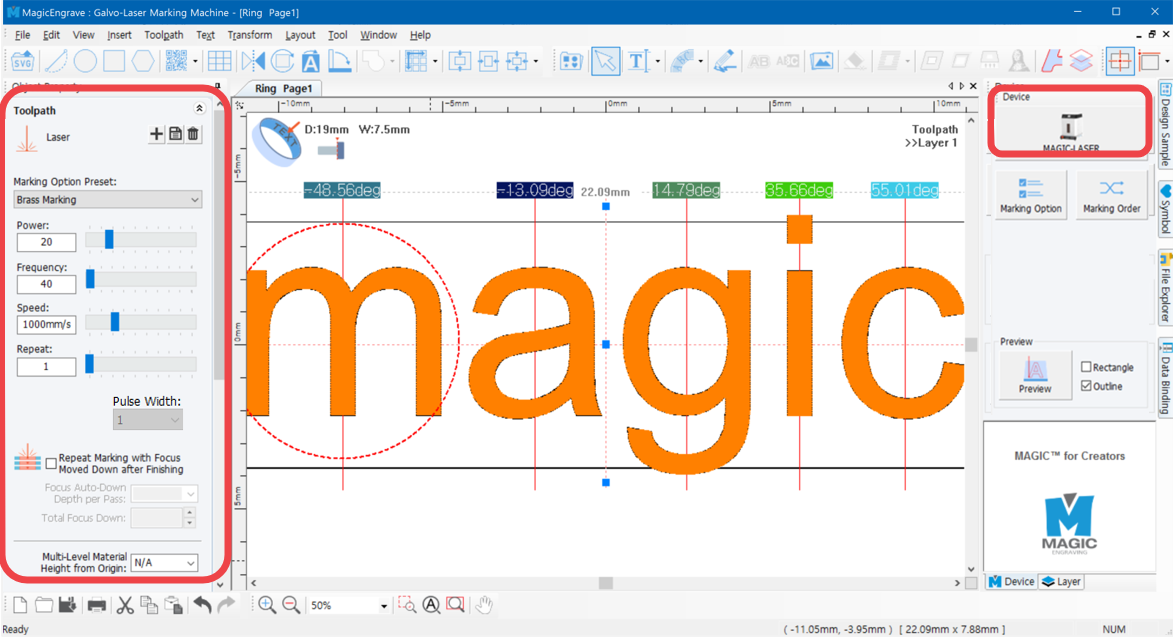
6. After selecting your preferred toolpath, set the laser marking option. Then click  button.
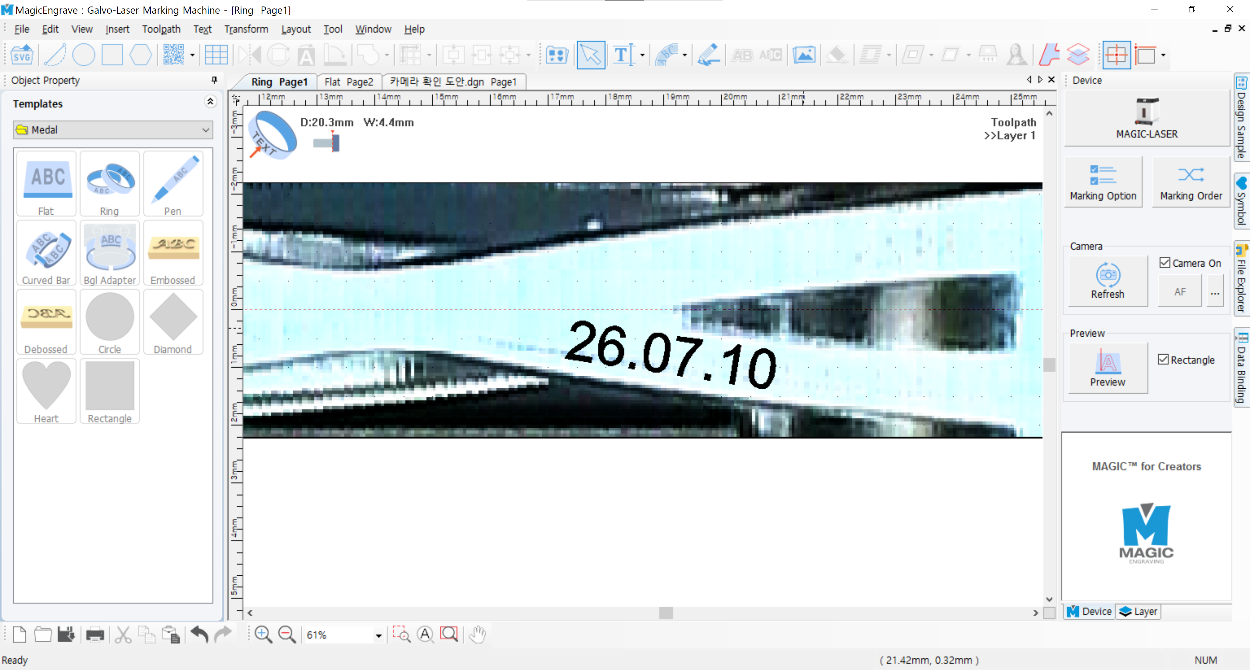
2) Ring Image Scan
● Rotary image scan is used for marking irregularly shaped rings and is optional.
● Before scanning, make sure the laser focus is precisely aligned with the ring surface. If the focus is incorrect, the accuracy of the scan and marking position may be significantly reduced.
● For inner diameter scanning, adjust the rotary angle first, then set the laser focus.
● Enter the ring diameter and width accurately. These values affect the accuracy of the scan results and marking position.
- Tap the Refresh button in the camera area to open the Rotary Image Scan window.
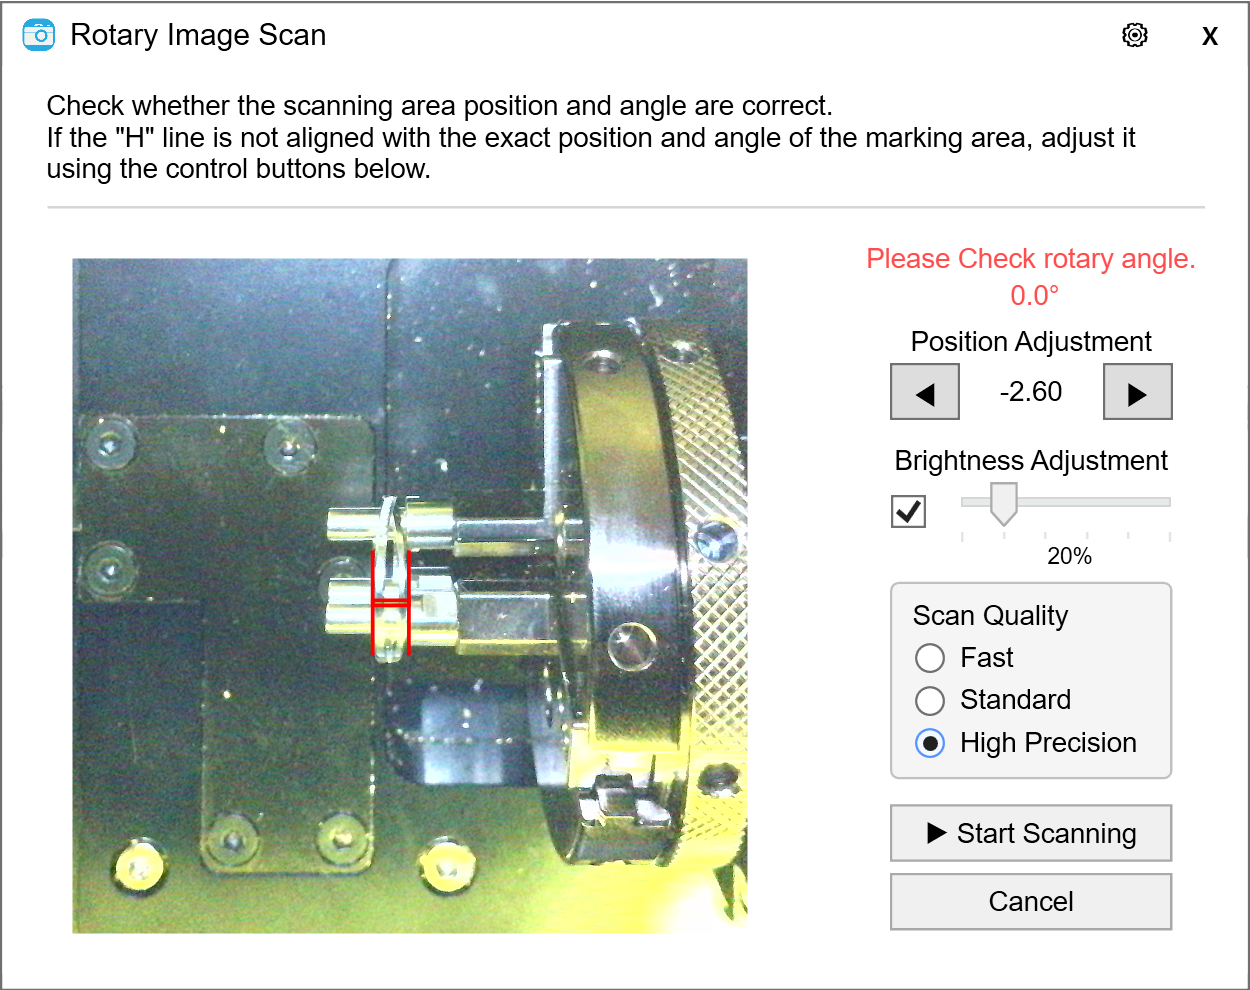
-
Adjust the rotary angle to the value displayed in the program.
-
Verify that the laser focus is aligned with the ring surface.
-
Tap the Position Adjustment ◀▶ button to move the "H" displayed on the screen to the desired scan position.
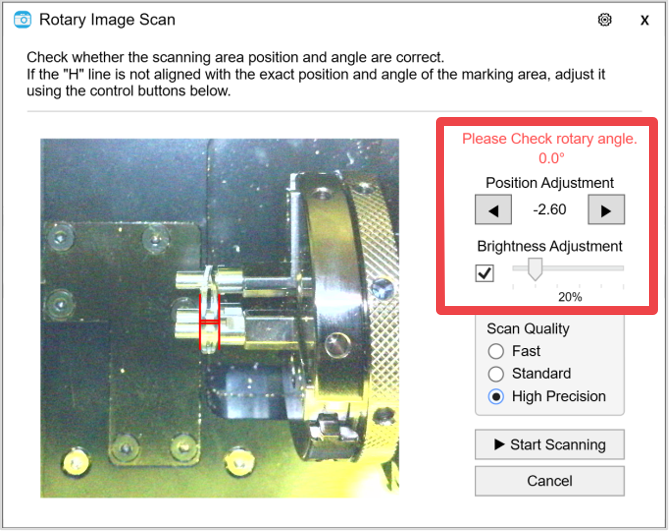
● If the image is not detected properly, adjust the brightness of the internal LED and pointer.
- Select the scan quality. Scan time increases as the setting changes from Fast to High Precision.
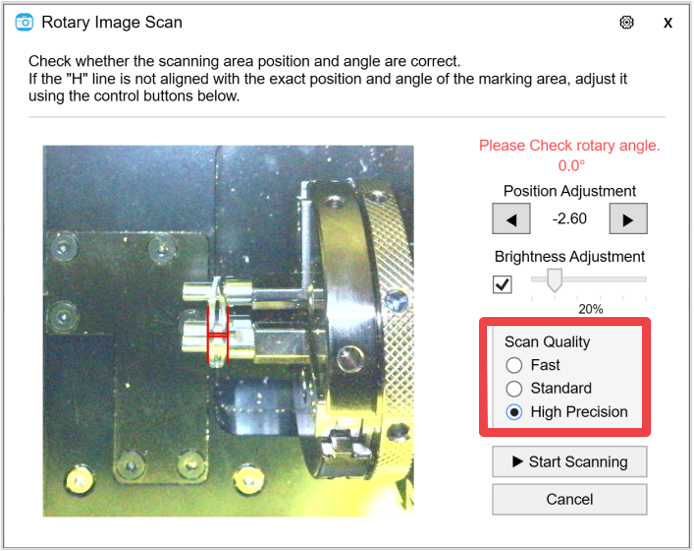
- Tap the ▶ Start Scan button to begin scanning.
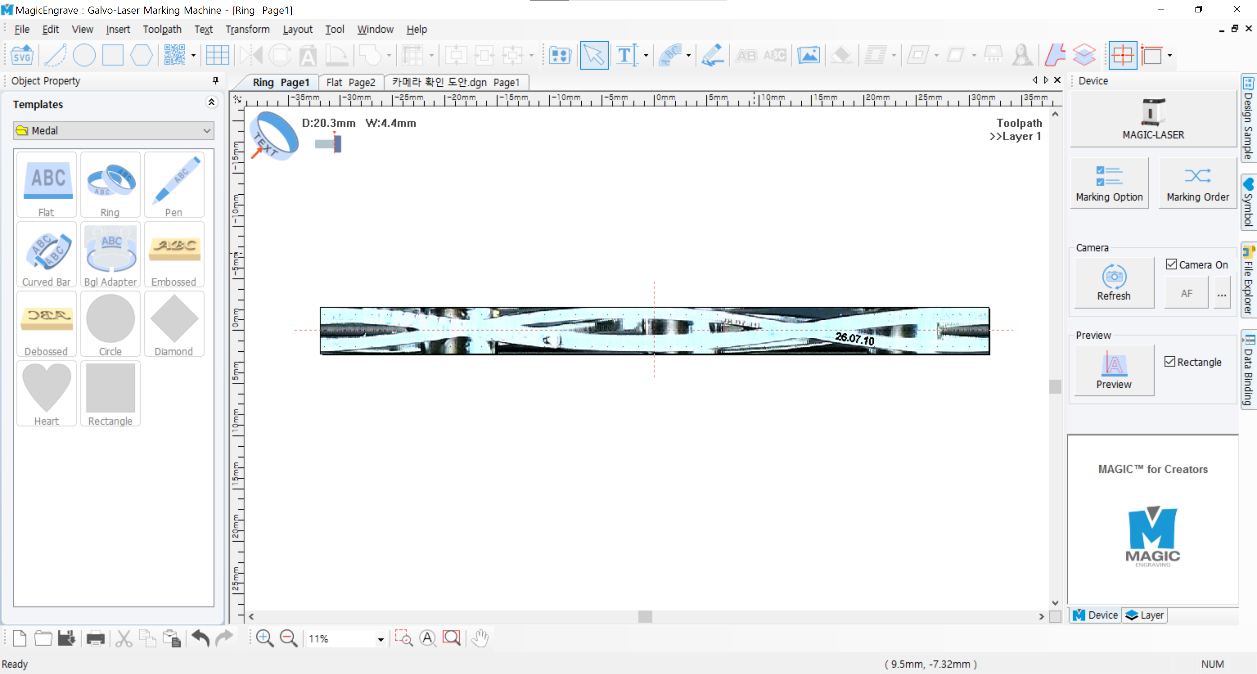
- Once the scan is complete, add text or other objects at the desired position, then proceed with laser marking.
Start marking
Once the tool is positioned to the center of the material and the laser pointer turns on, use the direction key buttons to position the laser pointer to the engraving area.
The area that the laser pointer points to is where the actual engraving takes place.
The round laser pointer in the middle represents the origin of the height of laser focus.
|
Whenever the direction key is pressed, the laser pointer moves up/down/left/right, showing a marking area.
Check if the marking zone is matched with the area on the material to be actually marked. If unmatched, adjust the position, using the direction keys. The laser pointer automatically points to the area where marking takes place (based on the target location on the work area). When the direction key is pressed, the laser pointer moves to the area to be marked (left, top, right or bottom) from its target location. If the marking area needs to be adjusted to the left, press  key to move the pointer to the left. 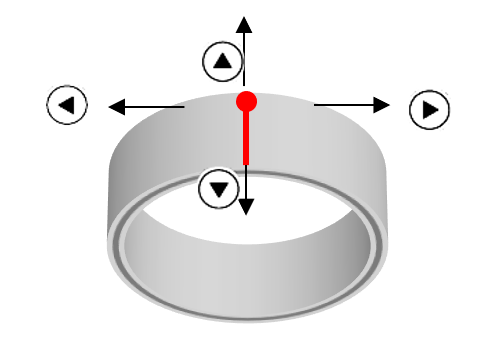 |
After positioning the laser pointer and determining the location of the marking area, click Start button on the program or long-press button on the machine (for more than 2 seconds) until the cover closes and the marking process begins.
· Repeat marking: Press and hold button to complete marking, then double-click button to repeat marking on the same material.
3. Bangle Marking
※Bangle clamp is sold separately.
- Double-click “Bangle adapter” template in the object property window.
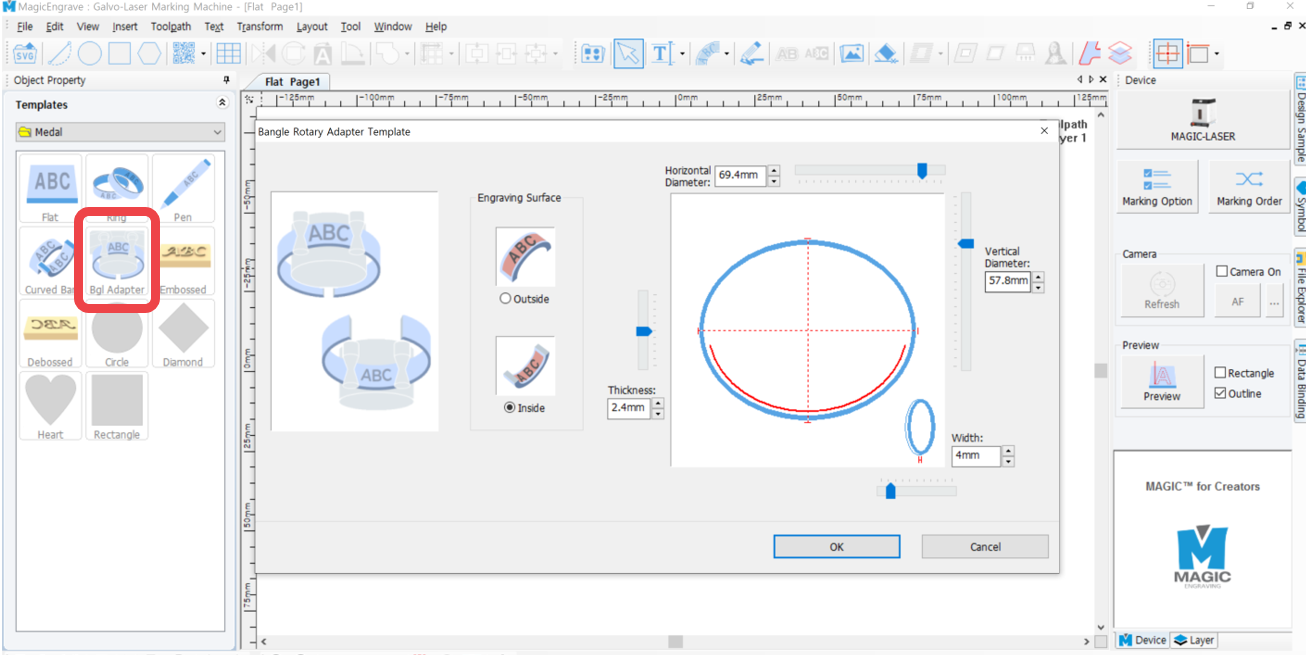
- When Bangle Rotary Adapter Template window appears, select one marking option: outside or inside. Then enter the width and diameter of the ring and click “OK.”
※ When working on the outer or inner diameter, the horizontal and vertical diameters must be entered accurately based on the outer diameter. If measurements are entered based on the inner diameter or are not accurate, the final result may not be as intended.
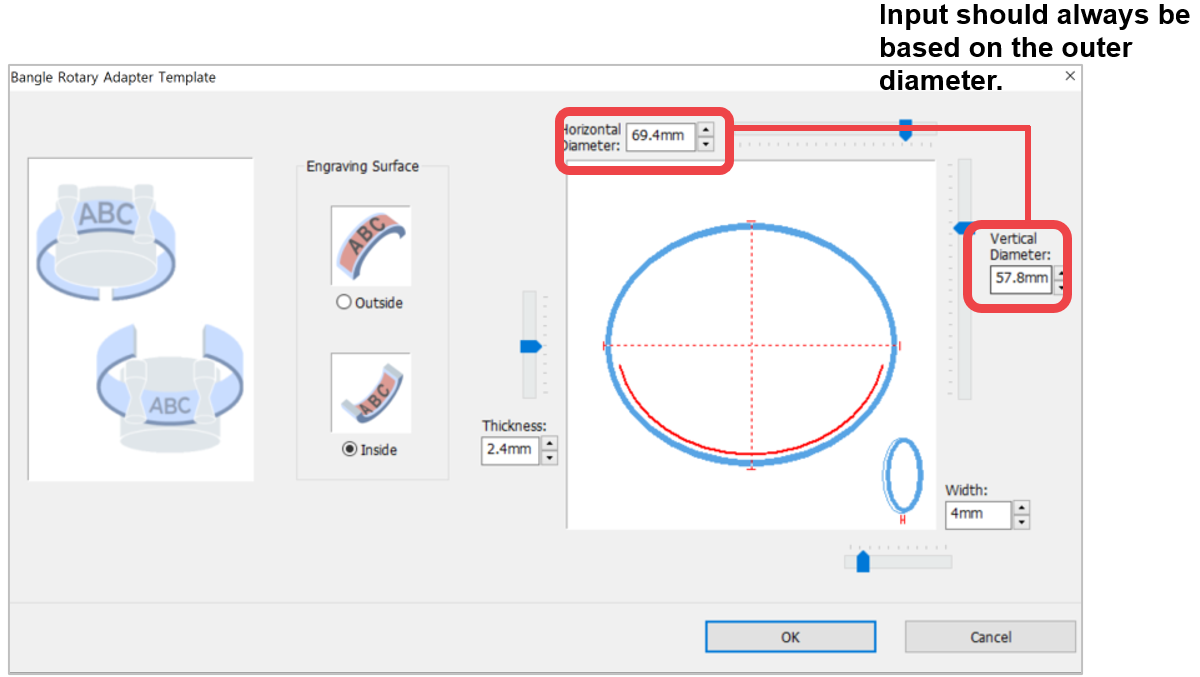
- From this point, the design process follows the same steps as the inner and outer diameter marking process for rings. Please refer to 3 on Ring Inner/Outer Marking Process and the subsequent sections
4. Upon completing the design, click Scanned line Toolpath button. A Toolpath refers to a path way of tools.
Once the tool is positioned to the center of the material and the laser pointer turns on, use the direction key buttons to position the laser pointer to the engraving area.
The area that the laser pointer points to is where the actual engraving takes place.
The round laser pointer in the middle represents the origin of the height of laser focus.
※ Unlike the rotary clamp, adjusting the left-right position saves the setting permanently, even after restarting the program.
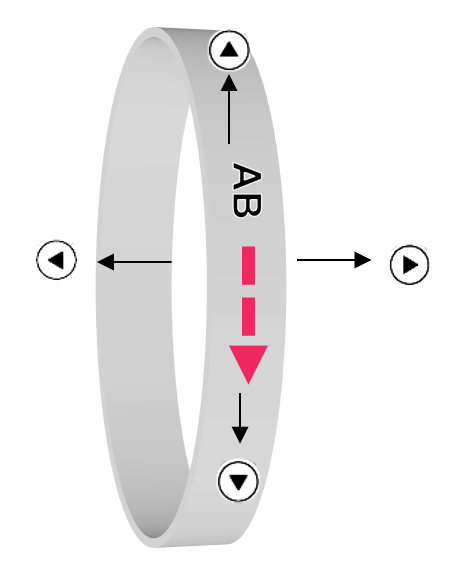
|
Whenever the direction key is pressed, the laser pointer moves up/down/left/right, showing a marking area.
Check if the marking zone is matched with the area on the material to be actually marked. If unmatched, adjust the position, using the direction keys. The laser pointer automatically points to the area where marking takes place (based on the target location on the work area). When the direction key is pressed, the laser pointer moves to the area to be marked (left, top, right or bottom) from its target location. If the marking area needs to be adjusted to the left, press key to move the pointer to the left.(AB Marking direction)
 |
- After positioning the laser pointer and determining the location of the marking area, click Start button on the program or long-press button on the machine (for more than 2 seconds) until the cover closes and the marking process begins.
· Repeat marking: Press and hold button to complete marking, then double-click button to repeat marking on the same material.
4. Photo Marking
What is Photo Marking?
Photo marking is a marking method that marks the shade of an image with dots.
- Place the material on the clamp and set the laser focus using the direction key (Z) buttons.
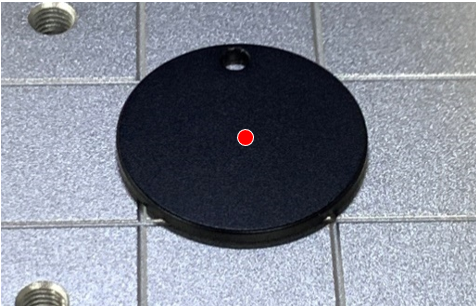
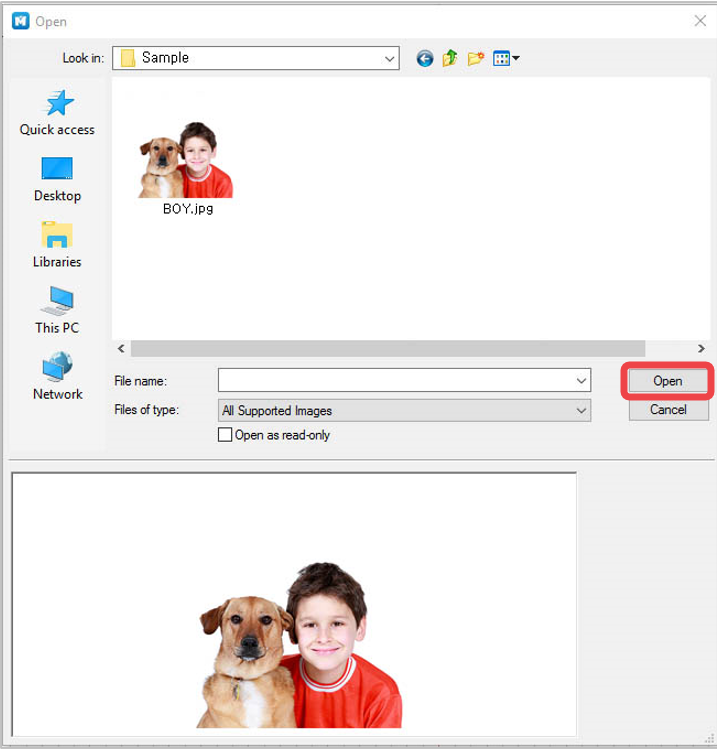
- Click
 Image to import an image for marking.
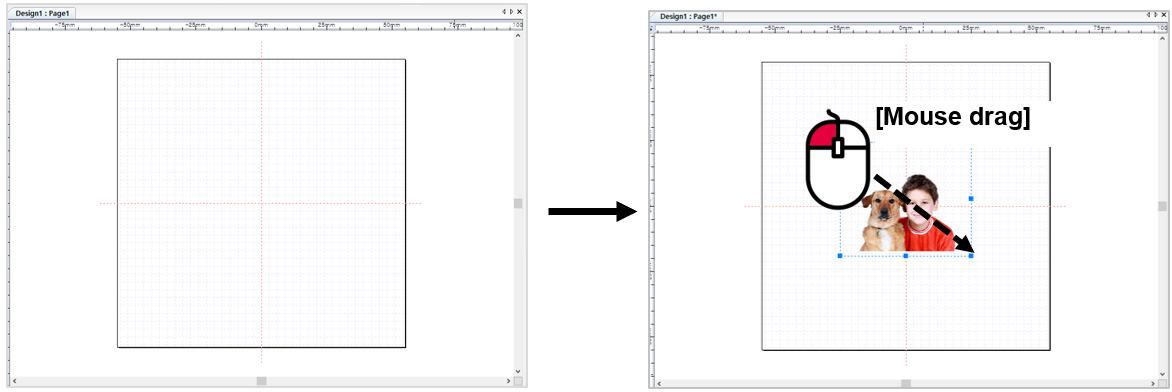
- Adjust the size and location of the image.
- Clipping Mask feature enables clipping or cropping of the target image. Drag the mouse over the image then create a shape.
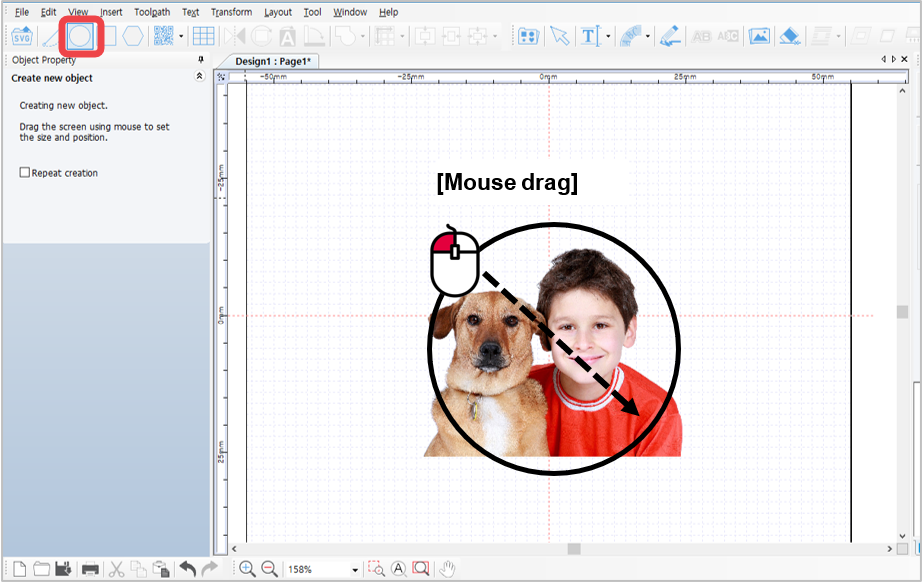
- Drag and hold the mouse to select the target image or select Menu → Edit → Select All.
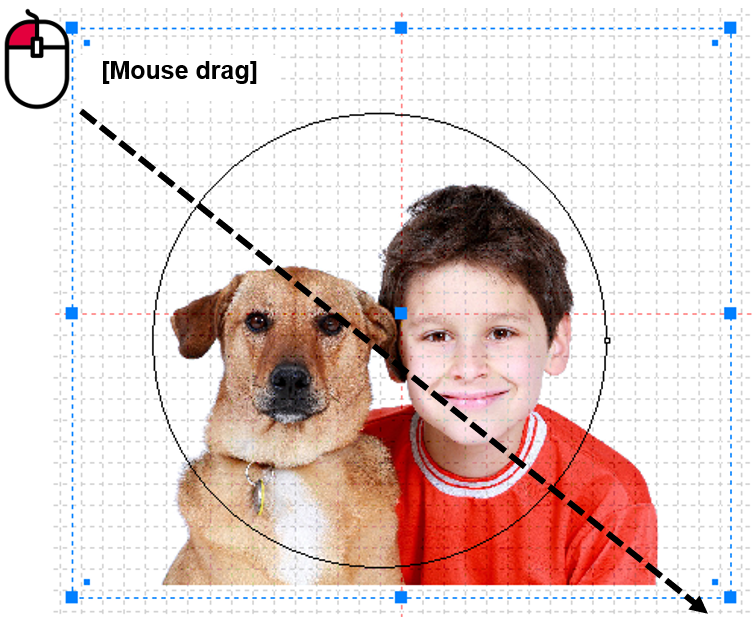
6. Then select Menu → Transform → Make Clipping Mask. Only the cropped image (target image) remains.
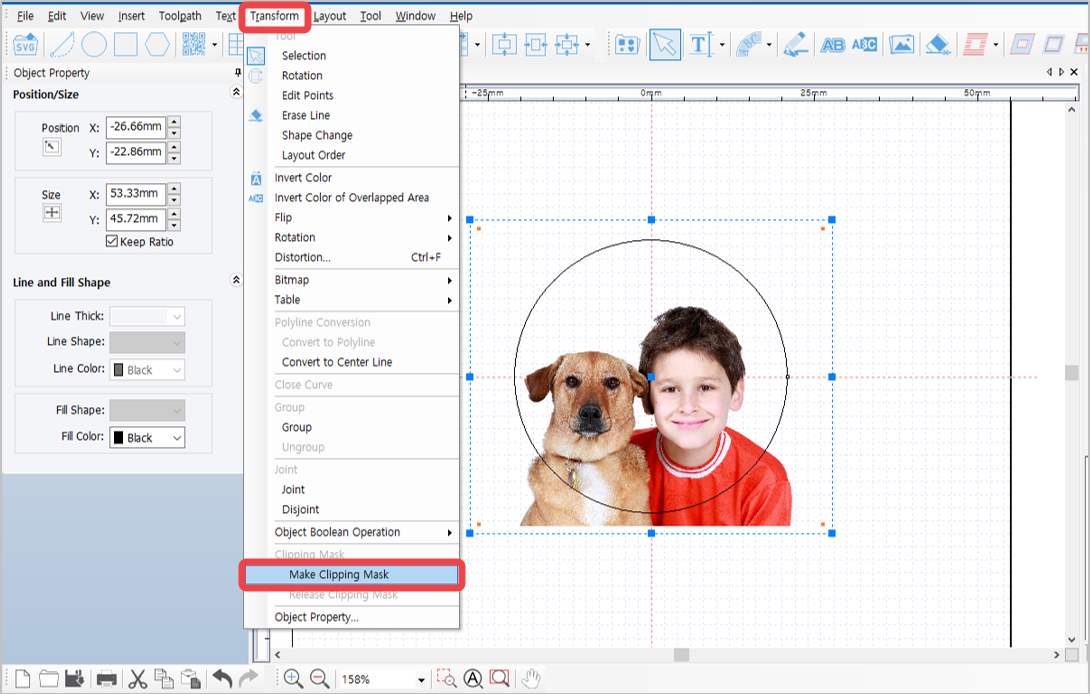
The original image is saved; not deleted or cropped out.
- Click
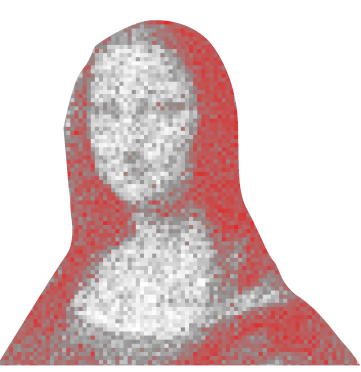 Photo Impact Engraving Toolpath button.
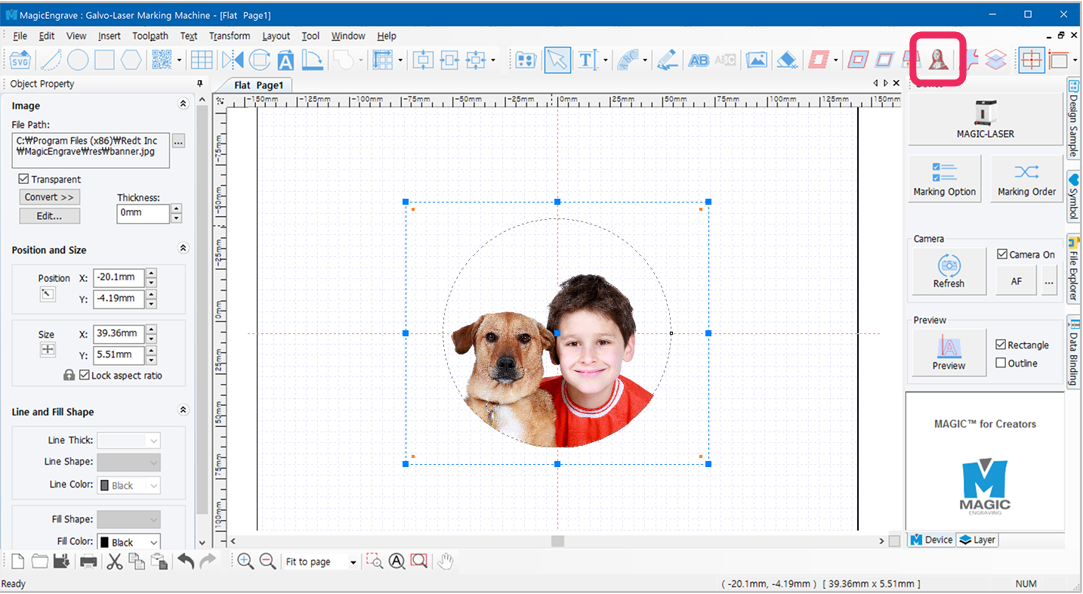
- Adjust marking options in photo marking option window.
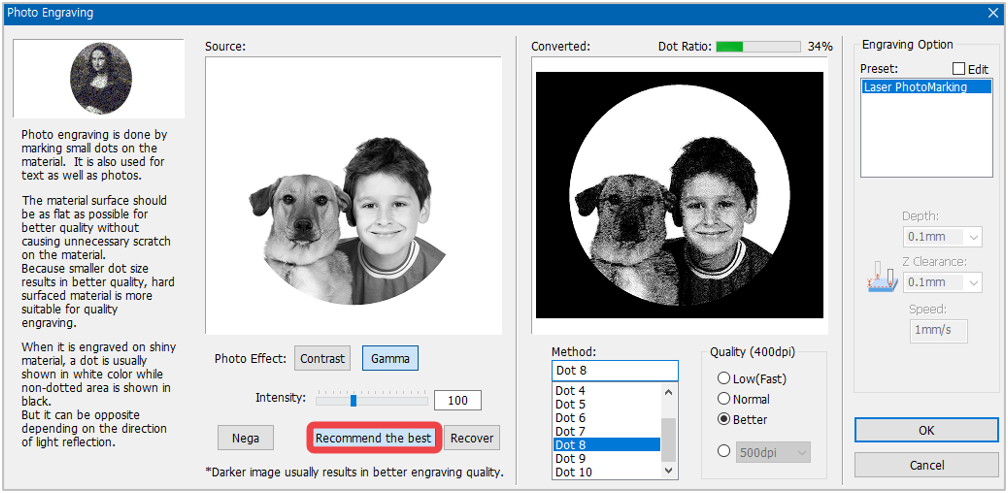
✽ The black area is not engraved; only the cropped image.
During photo marking process, the brighter area (white area) of an image is not visibly expressed with dots unlike the darker area where dots are highly visible with higher marking quality. Therefore, it is recommended to adjust the brightness of an image to darker. Normally, a dot ratio of 10-20% provides the best marking quality for a portrait. Take note that the image’s optimal conditions vary depending on the brightness of background of the image. Check image preview then adjust the image’s brightness and dot ratio. If ‘image adjustment’ is confusing, click “Recommend the best” button to automatically adjust the image.
- Click “OK” button to create a toolpath for photo marking. Set the marking option then click button.
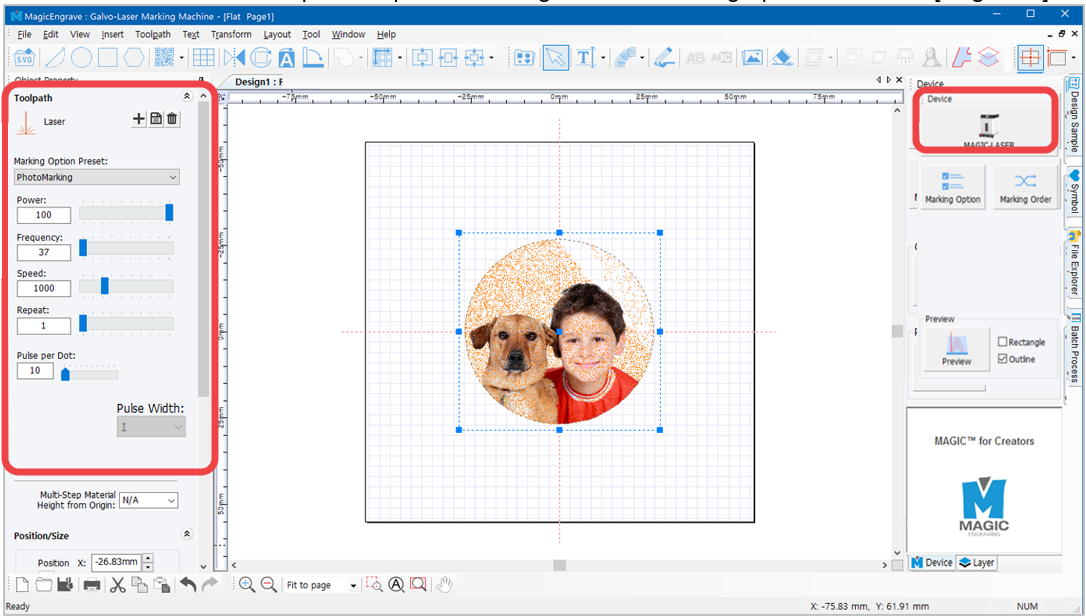
During marking process, the white area of the image appears with dots. The image result of the toolpath is shown as a negative image.
- Once the tool is positioned to the center of the material and the laser pointer turns on, use the direction key buttons to position the laser pointer to the engraving area.
The area that the laser pointer points to is where the actual engraving takes place.
The round laser pointer in the middle represents the origin of the height of laser focus.
|
Whenever the direction key is pressed, the laser pointer moves up/down/left/right, showing a marking area.
Check if the marking zone is matched with the area on the material to be actually marked. If unmatched, adjust the position, using the direction keys. The laser pointer automatically points to the area where marking takes place (based on the target location on the work area). When the direction key is pressed, the laser pointer moves to the area to be marked (left, top, right or bottom) from its target location. If the marking area needs to be adjusted to the left, press key to move the pointer to the left.
|
- After positioning the laser pointer and determining the location of the marking area, click Start button on the program or long-press button on the machine (for more than 2 seconds) until the cover closes and the marking process begins.
· Repeat marking: Press and hold button to complete marking, then double-click button to repeat marking on the same material.
5. Cutting Process
※Honeycomb table is sold separately.
- Measure the thickness of a material to be cut.
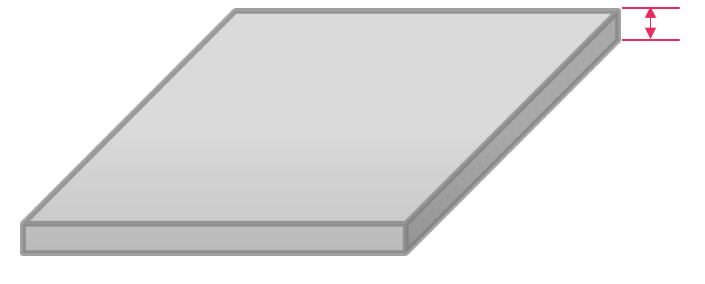
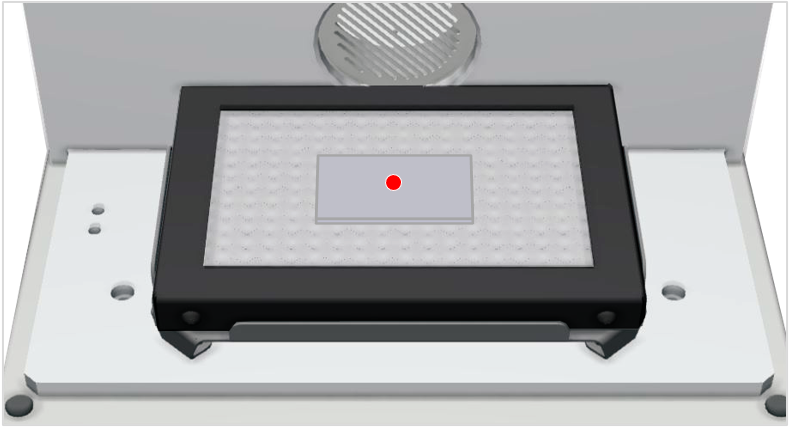
- Place the material on the honeycomb table then set the laser focus using the direction key (Z) buttons.
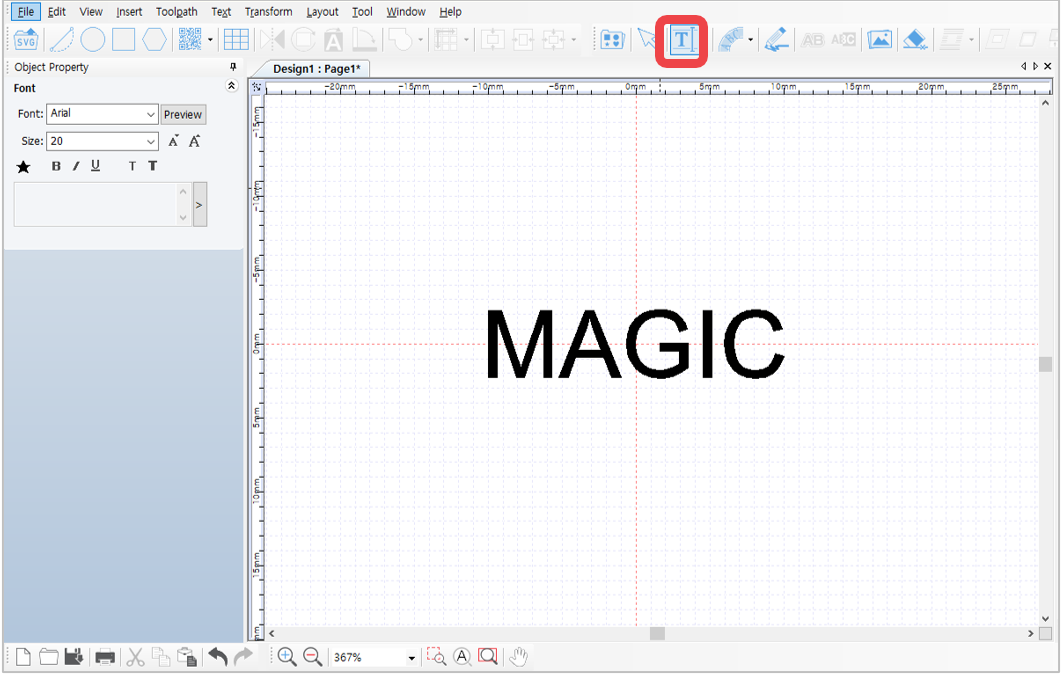
- Click Text Input button on the toolbar to enter the text input mode then click at any target area to enter text.
4. After entering the text, click Selection on the toolbar to select the text and designate the font.
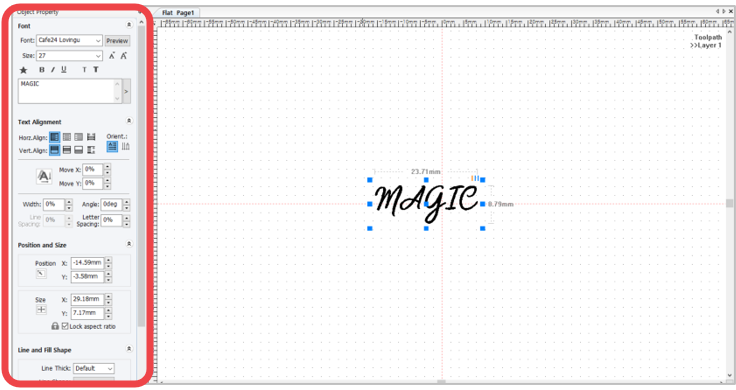
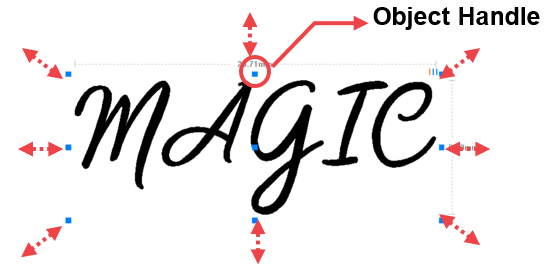
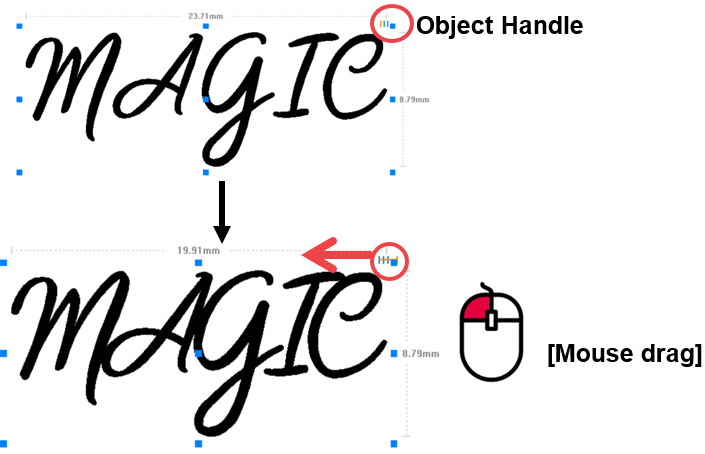
Adjust the text according to the desired size. Use the object handle (shown in the picture below) or go to object property window.
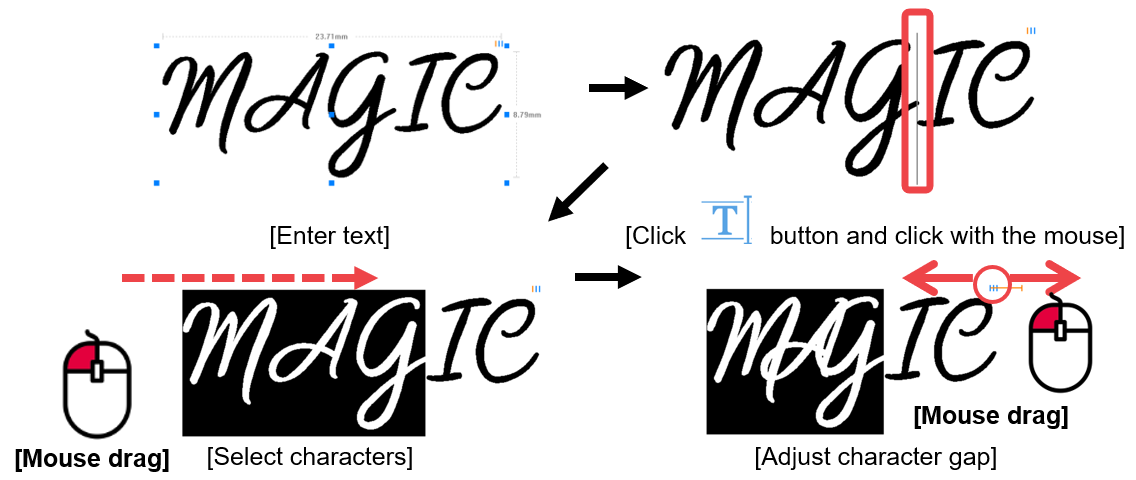
- Drag with the mouse the text gap adjustment handle (shown in the picture below) to narrow or widen the gap between the characters.
If the gap in between each character is partially adjusted, click Text Input button then drag the mouse to select the characters. Drag the text gap adjustment handle with the mouse then adjust the gap.
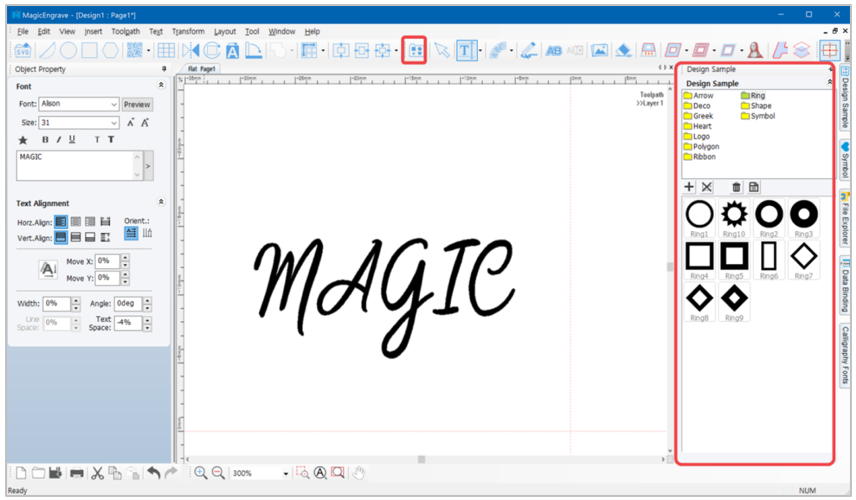
- Insert a ring design that matches your characters from the design sample section.
*Design sample: Click or Menu → View → Design sample.
- Double-click the chosen ring design then designate its location on the work area.
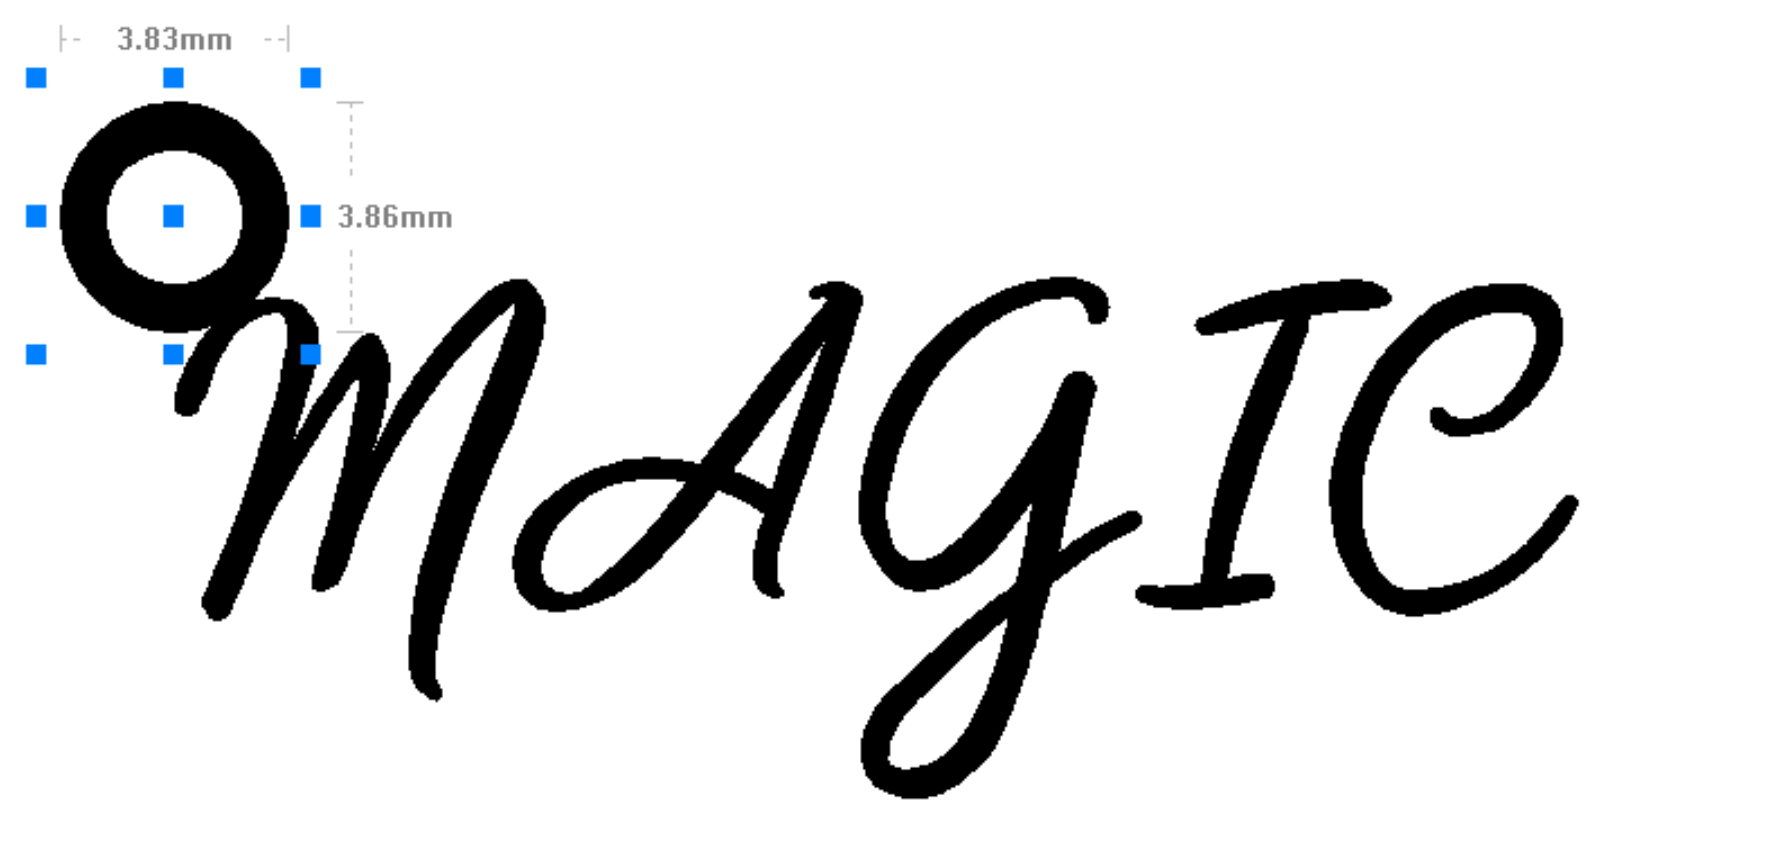
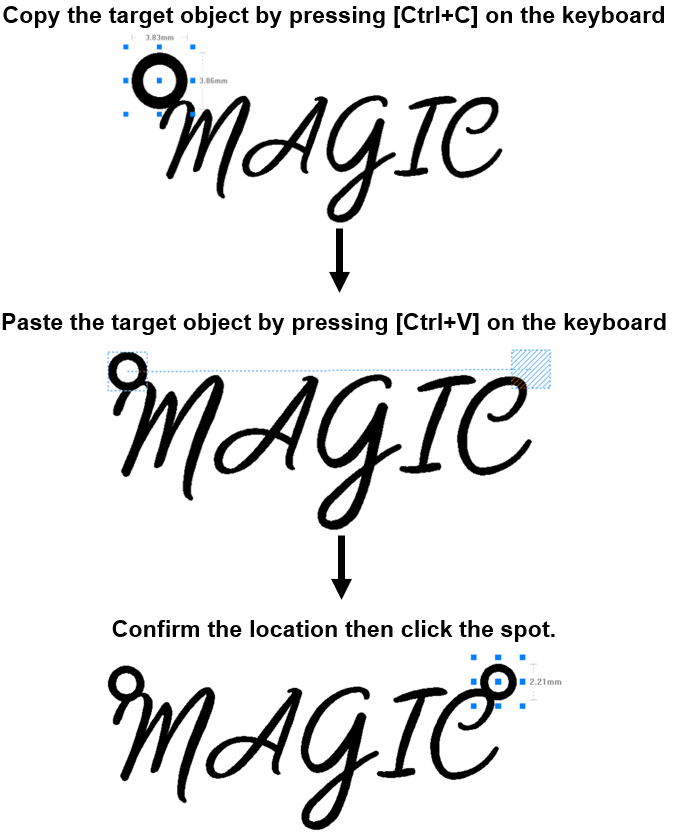
8. Copy and Paste the ring design to reveal a guideline for the location of the ring. Adjust the location, then left-click with the mouse.
- Select all the objects, then right-click to see the menu then select Group.
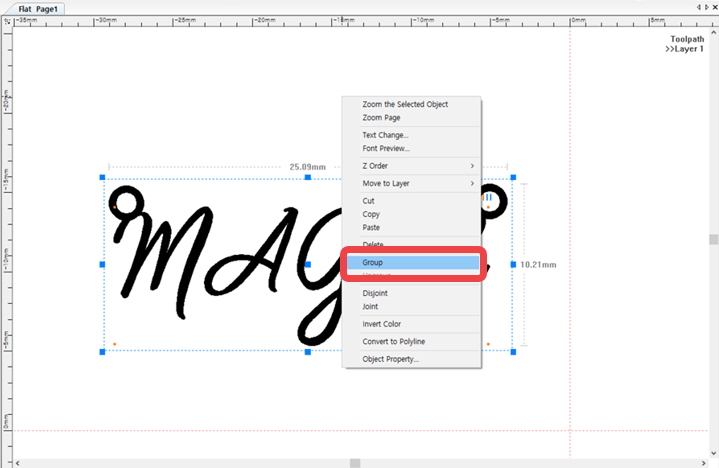
✽Select all objects: Drag the objects with the mouse or select Menu → Edit → Select All.
- Upon completing the design, click
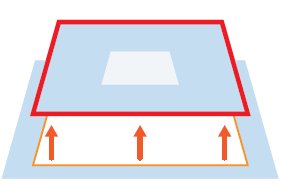 Cut-Out Toolpath.
- Once the “Cut-Out” window appears (as seen in the figure below), select the tool to be used for cutting. Enter the material’s thickness and other options then click “Create Toolpath.”
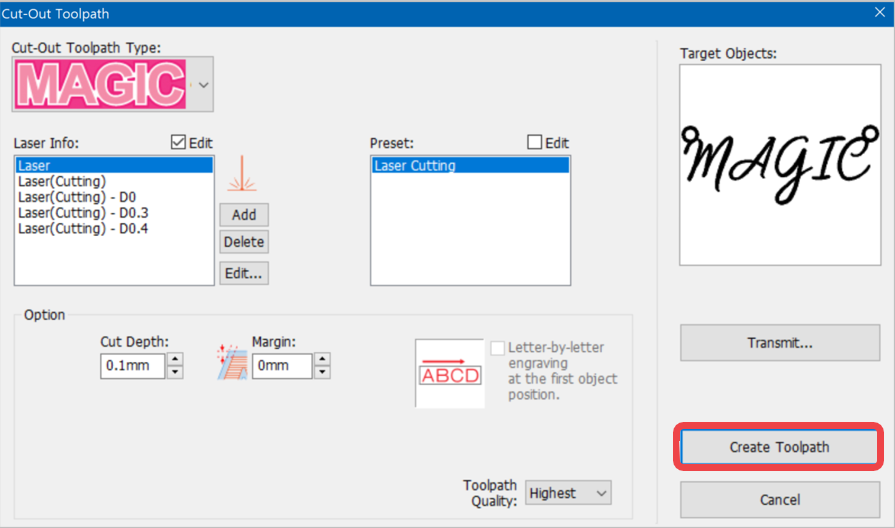
- “Toolpath” is created.
- After creating the toolpath, set the laser marking option then click button.
|
Whenever the direction key is pressed, the laser pointer moves up/down/left/right, showing a marking area.
Check if the marking zone is matched with the area on the material to be actually marked. If unmatched, adjust the position, using the direction keys. The laser pointer automatically points to the area where marking takes place (based on the target location on the work area). When the direction key is pressed, the laser pointer moves to the area to be marked (left, top, right or bottom) from its target location. If the marking area needs to be adjusted to the left, press key to move the pointer to the left.
|
- After positioning the laser pointer and determining the location of the marking area, click Start button on the program or long-press button on the machine (for more than 2 seconds) until the cover closes and the marking process begins.
· Repeat marking: Press and hold button to complete marking, then double-click button to repeat marking on the same material.
6. Curved Materials Marking
When marking on materials with curved surfaces, select a curved surface template in the MagicEngrave program. Enter the height, width and depth of the material then click OK. Once the measurement is entered, the z-axis automatically moves along the material’s surface and marks each text.
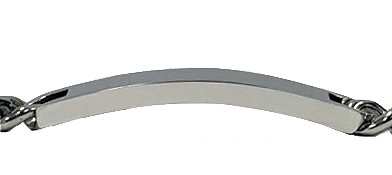
Take note that the machine only marks texts on materials with curved surfaces; other designs are not applicable.
- Select the Curved Bar template.
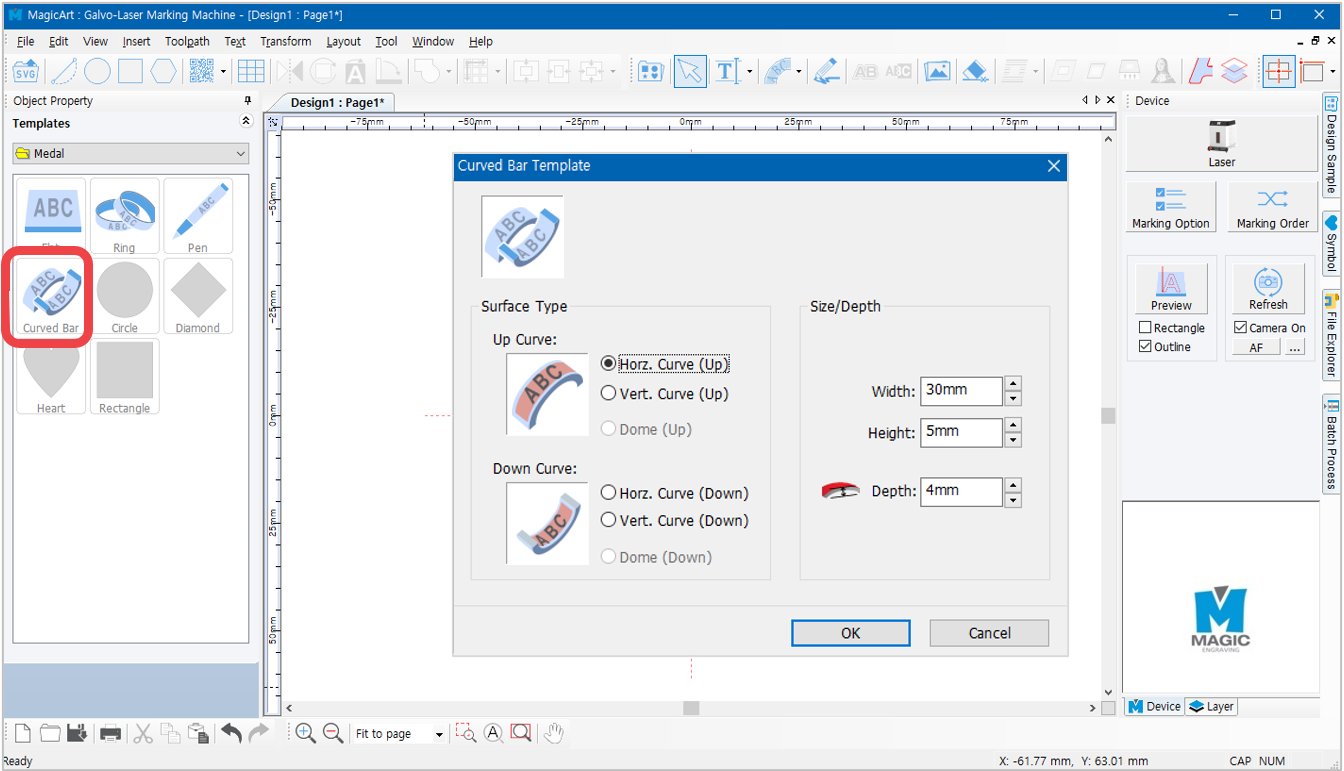
Z-axis movement is calculated based on the measurement entered. Entering incorrect measurement may result in z-axis movement error.
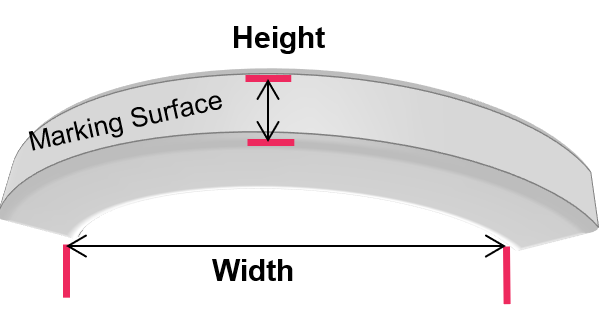
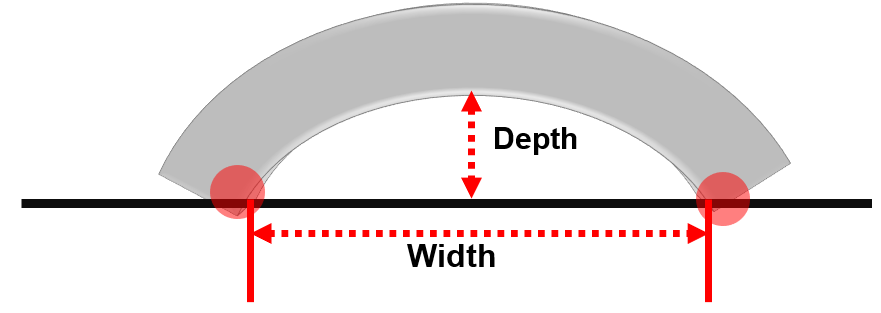
To achieve accurate measurement data, place the curved material on a flat surface then measure its height, width and depth (as shown below). The distance between the two end points must be measured based on the end points that touch the surface.
- Enter the text then create a tool path.
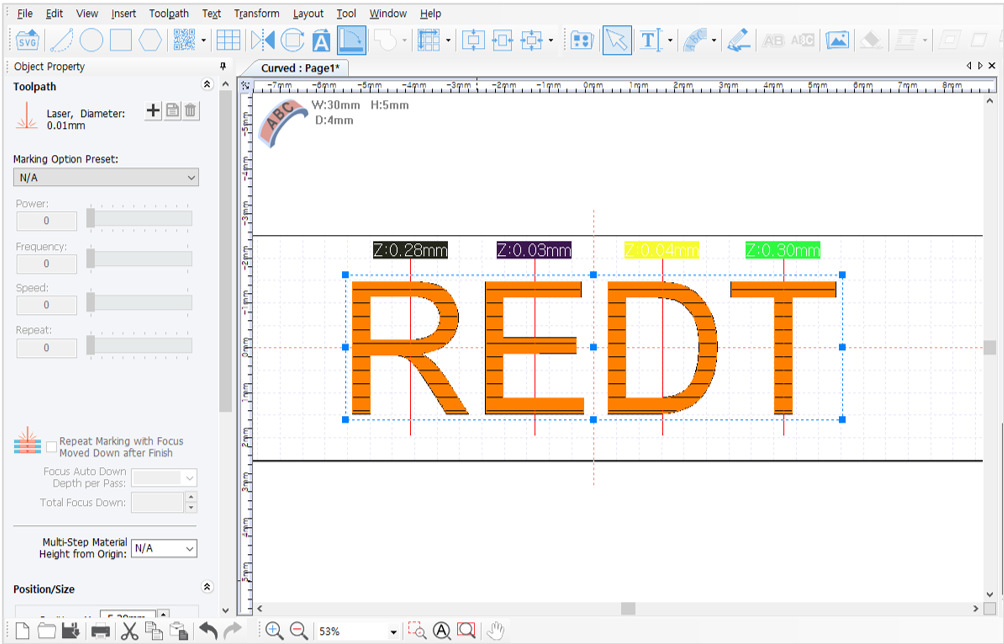
*Z-axis marking movement data is displayed on the screen (as shown below).
- Send the data to start marking.
*Z-axis automatically moves along the surface and marks each text based on the calculated angle.

7. Shape Distortion
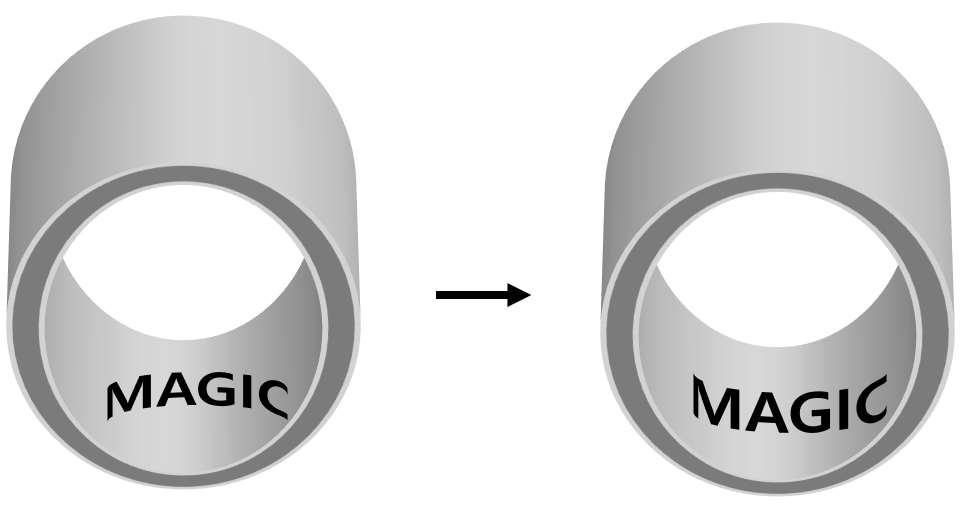
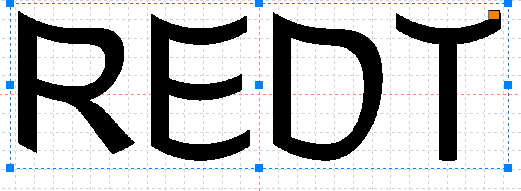
Text shape can be distorted during laser marking process. Distortion in text shape can be corrected with Text Shape Distortion function.
Be sure to check the guide laser and enter the distortion value.
Take note that this function applies only to texts and shape figures; not images or circular texts.
Curved Text Distortion
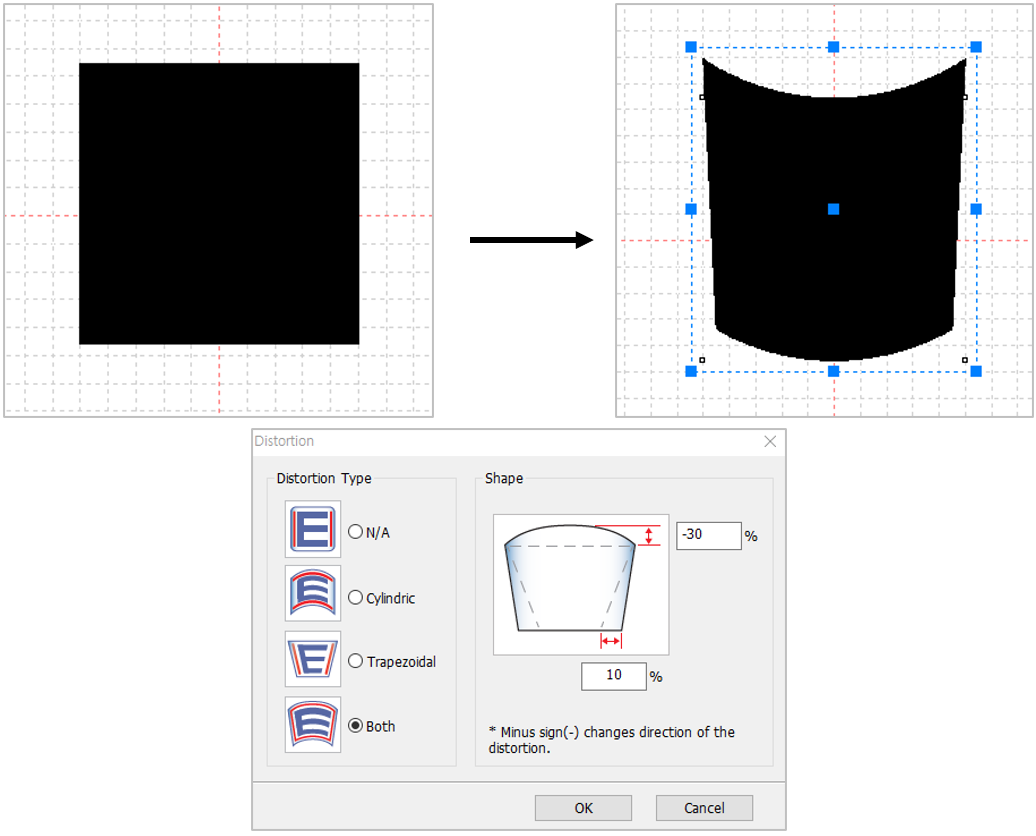
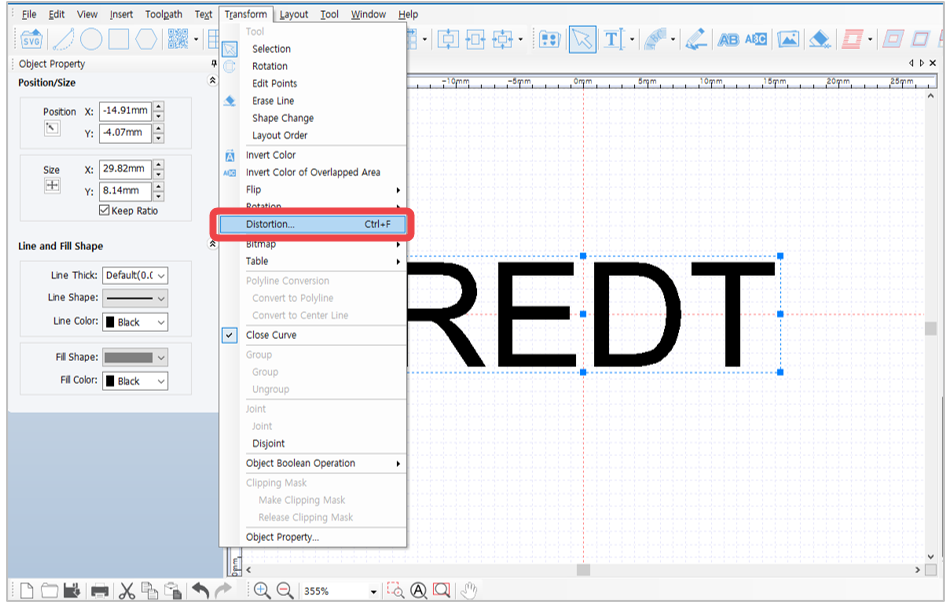
Text shape can be distorted with the use of MagicEngrave program. To create shape figures go to Menu → Transform → Distortion.
How to Distort Text Shape
When Distort Shape is clicked, the shape of each text is distorted even without converting each text object into a curved text.
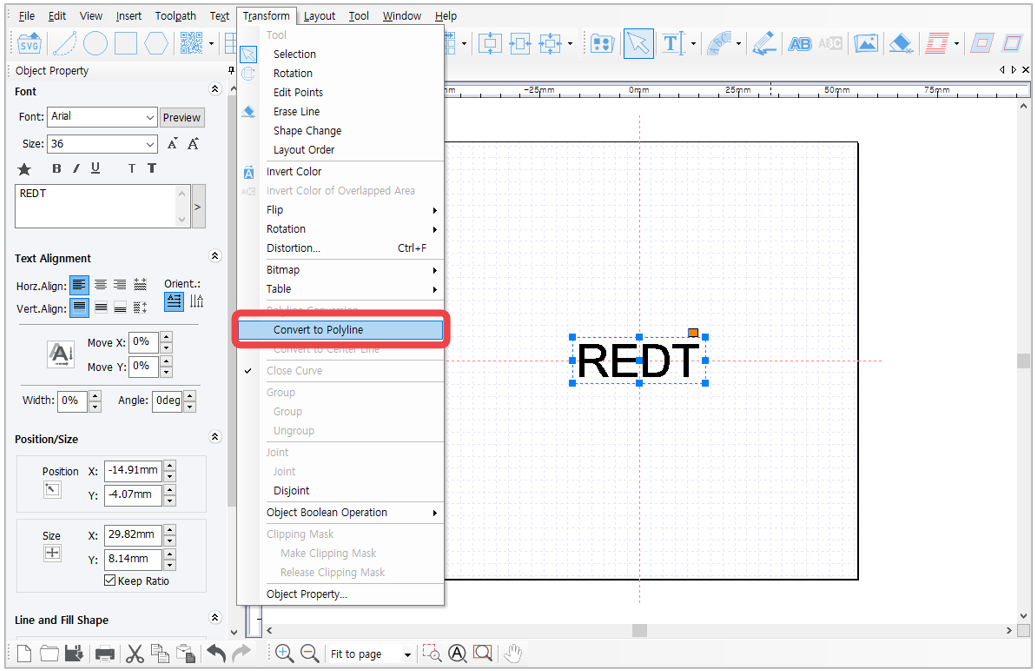
- Enter the text then click Menu → Transform → Convert to polyline.
(Or select the text object then right-click → Convert to polyline)
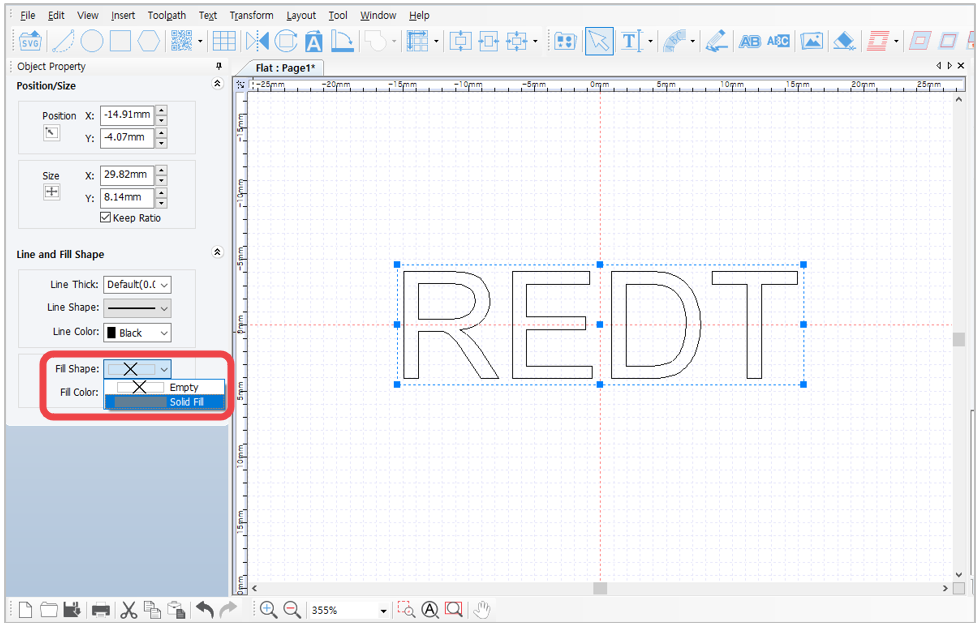
* The text is converted into shape figure (i.e., curved text).
Editing text is not applicable once the text is transformed into figure.
2. Once the text is converted into curved text, go to Line and Fill Shape options (in the Object Property window on the left) then change Fill Shape to Solid Fill.
- Then go to Menu, click Transform → Distortion.
- Select a shape and enter a value. If a negative value is entered, the shape of the shape selected is reversed.
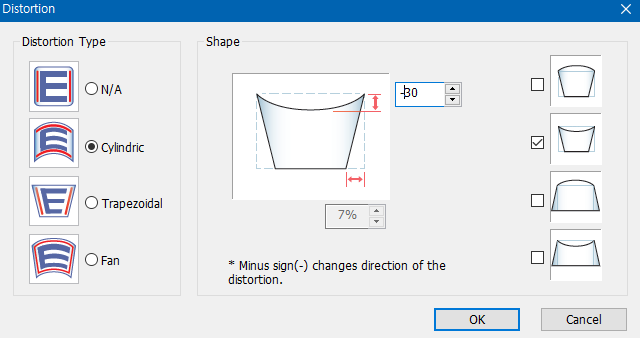
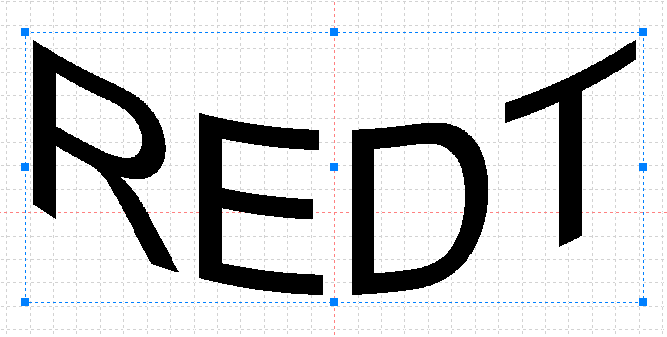
- For example, if Cylindric shape is selected and a negative value is entered, the shape of the text will appear reversed (as shown below).
8. Layout of text in a circle
Texts can be arranged around a circle by using circular text object.
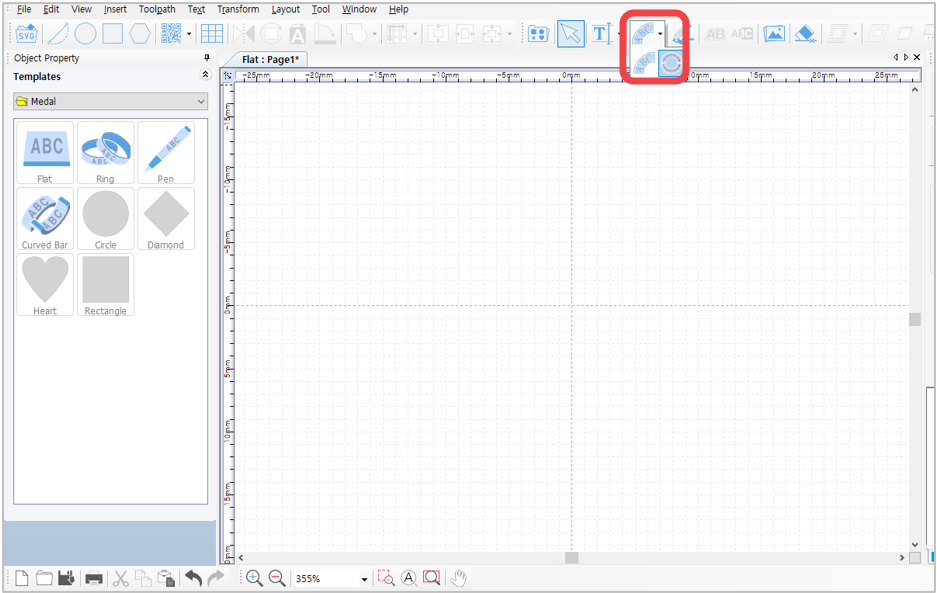
Circular Text
Click  button to display “Circular Text” window. Designate direction and angle, enter the size and text, then click “OK” button.
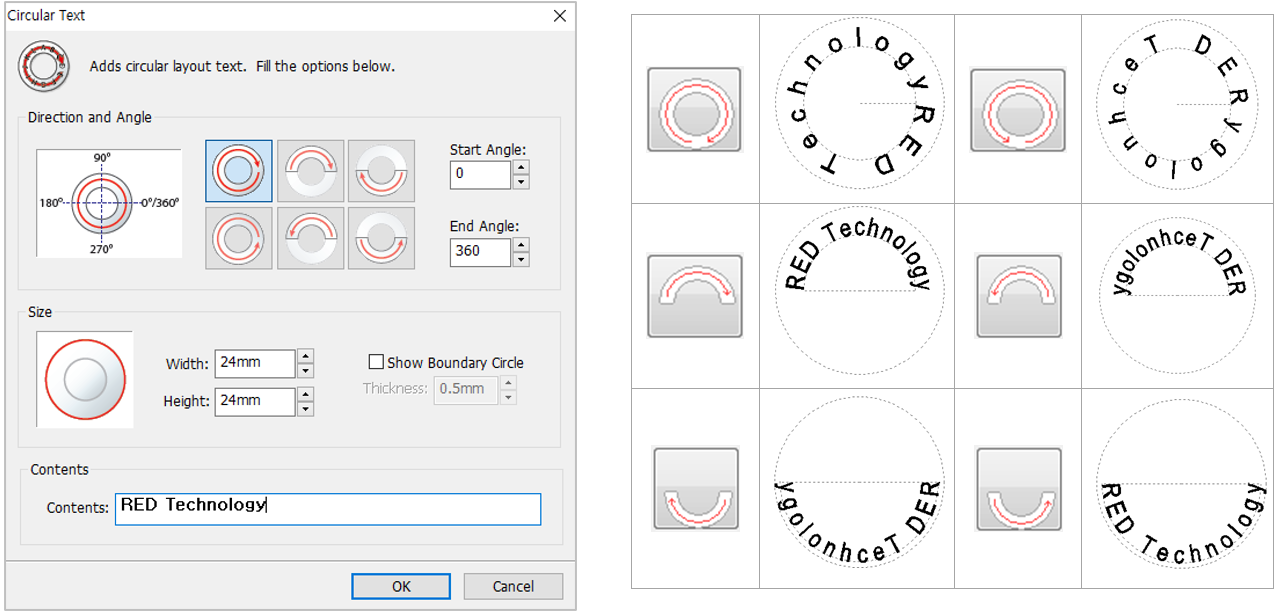
Circular Text- Top/Bottom
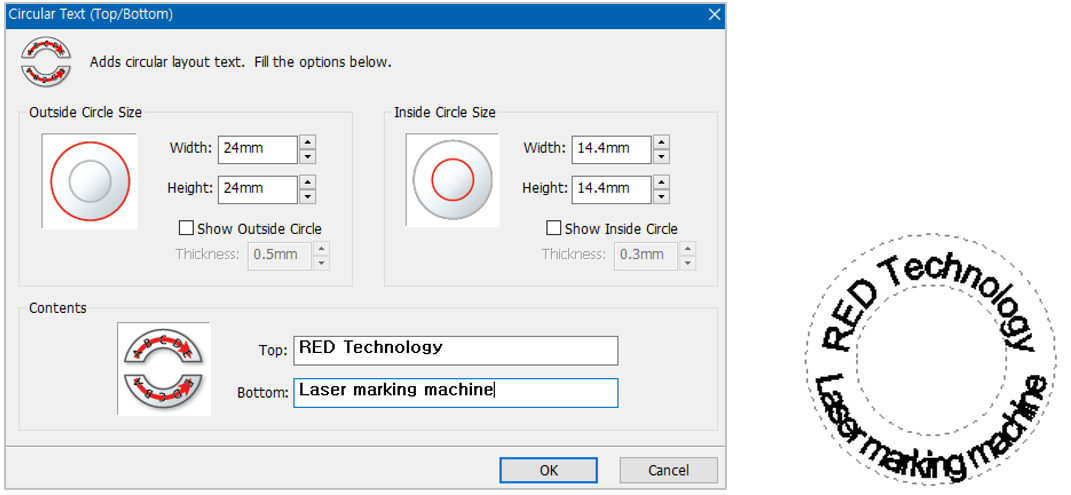
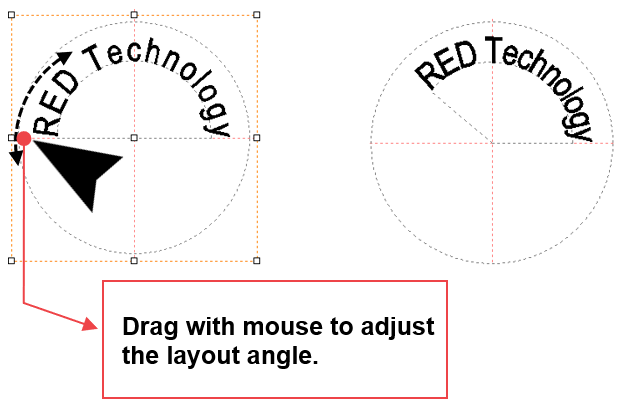
Adjusting layout angle
Drag the first character R or last character y in the text to adjust the angle of the layout.
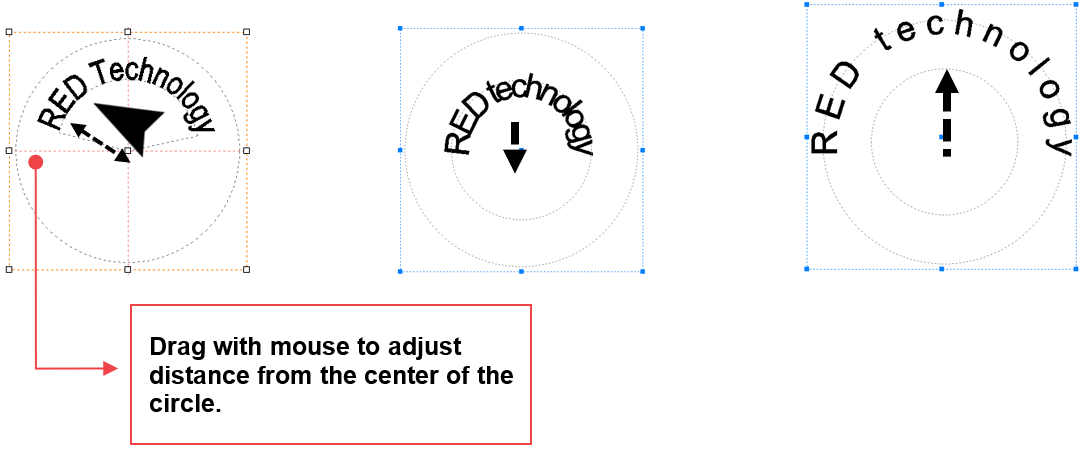
Drag other characters with the mouse to adjust the distance to the center of the circle.
9. Layout of text in a curve
- Click the
 Line/Curve button.
- Left-click to display the dotted lines then designate a distance.
Drag the mouse to make a curve appear then right-click to create one.

- Select “No Line” on the “Line and Fill Shape” window on the object property window.
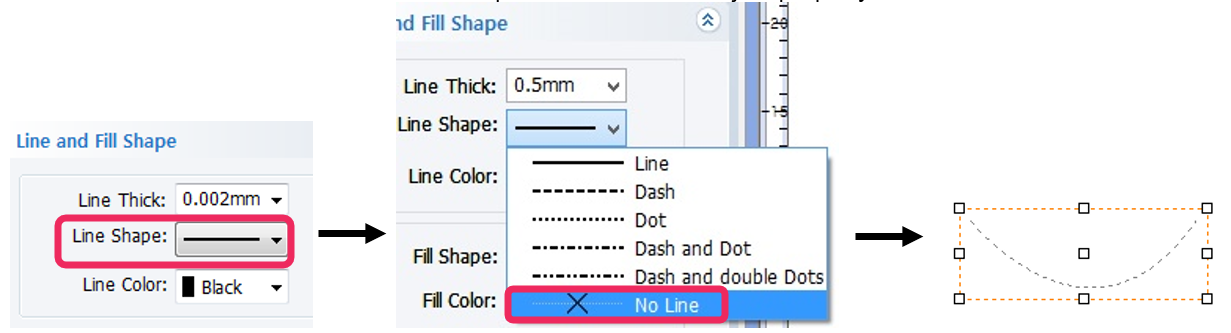
- Click Text Input button then move the mouse cursor to the curve line. The cursor will change to text cursor as shown below.
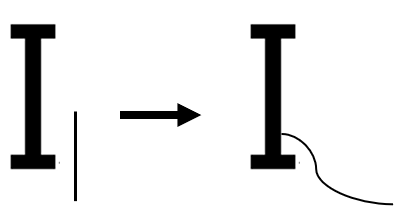
- When the cursor changes to text, click the curve line then enter the text.

10. Text Change
The content of a text can be changed by using Text Change feature.
Open a saved design sample, file or select the text objects entered on the work area. Click  Text change button or right-click with the mouse then select Text Change on the menu. Or, select Menu → Text → Text change.
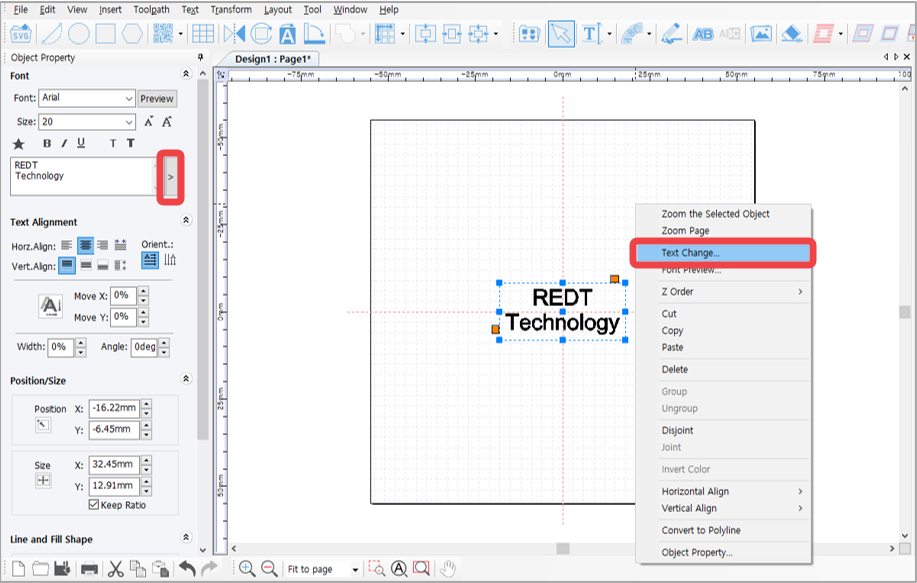
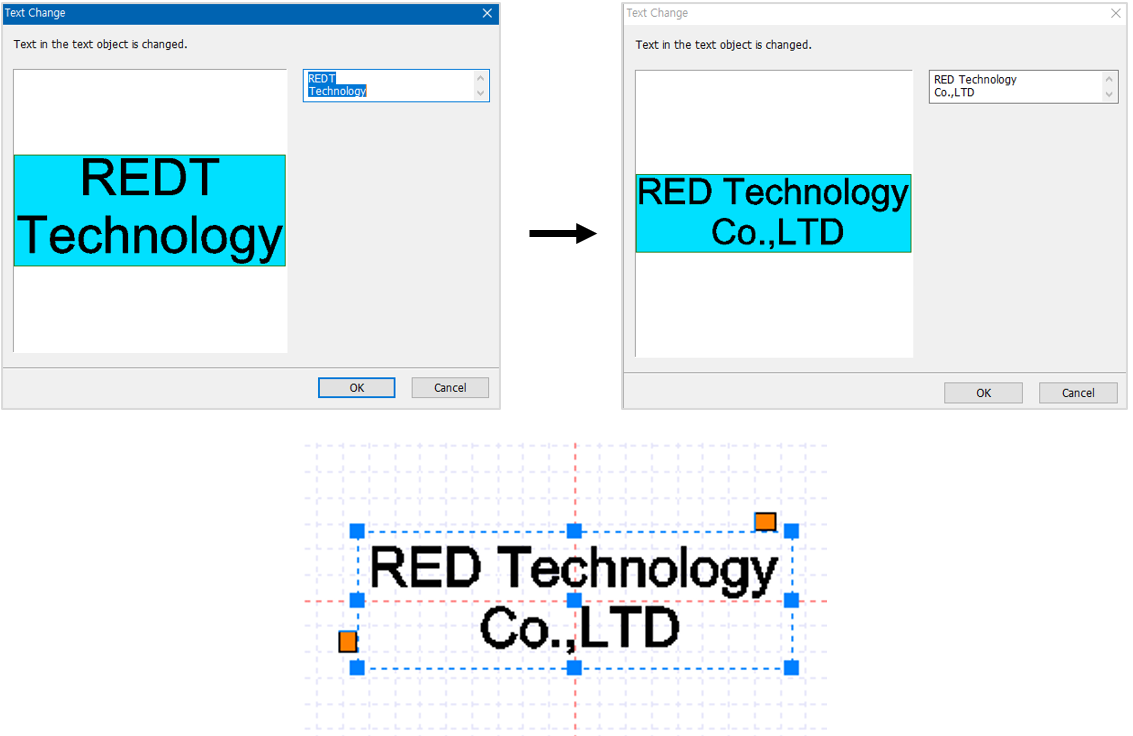
Change the content in the “Text Change” window then click “OK” button. The modified text will be shown on the screen.
11. Multi-height auto leveling Marking
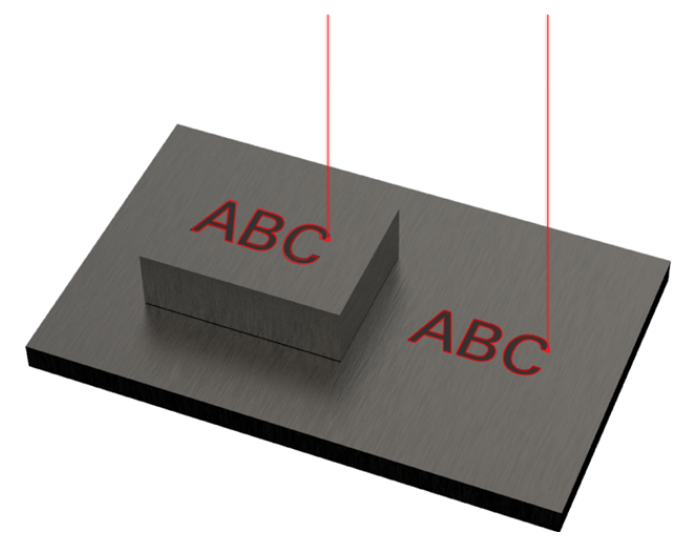
This function enables marking on materials with different heights or thicknesses all at once.
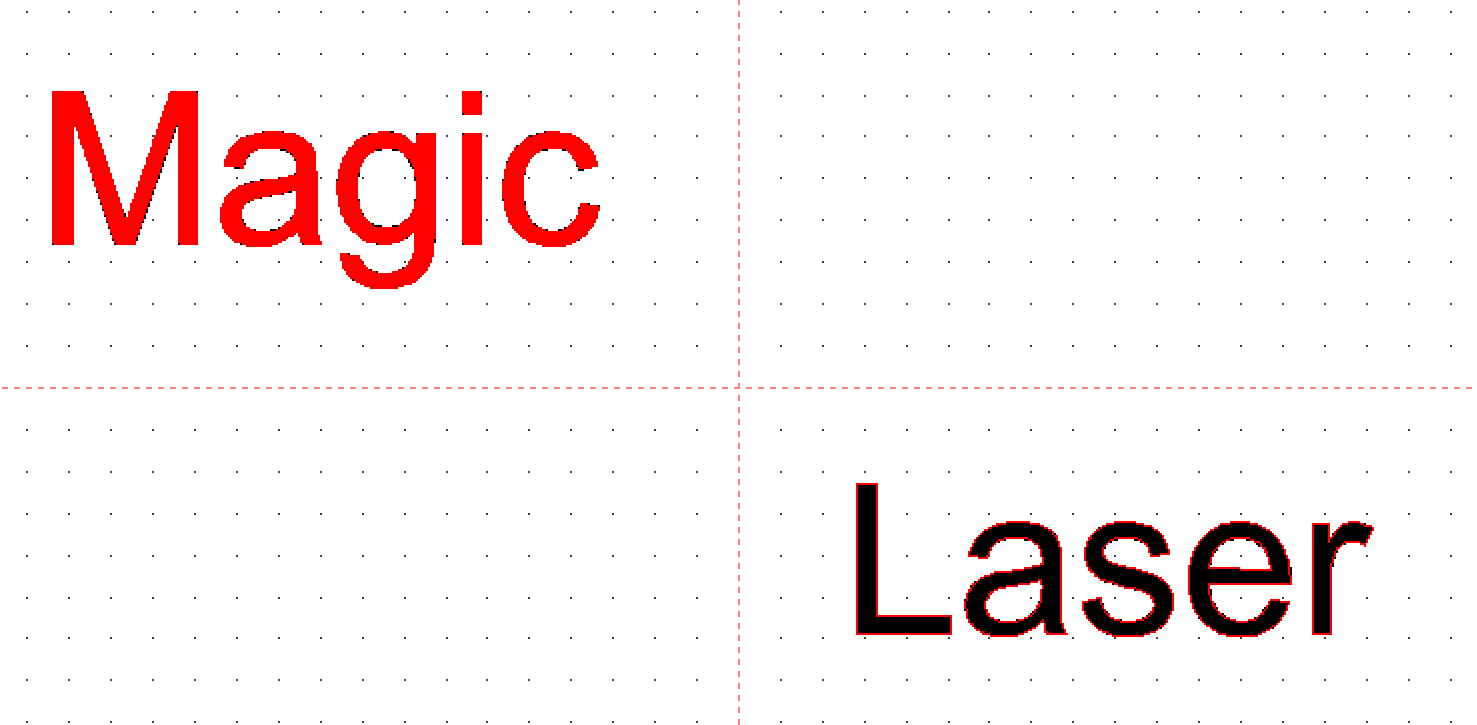
- Enter the text then create a toolpath.
(Example: Magic/Laser).
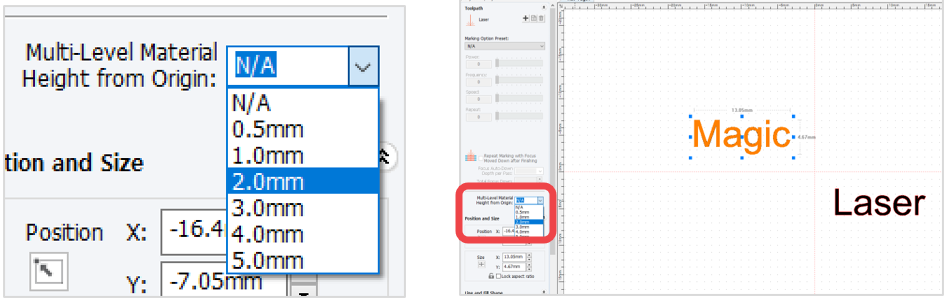
- Once the toolpath for the text object “Magic” is selected, the laser option window appears on the left side of the screen.
Click Multi-Level Material Height from Origin button to select the height of the material or, enter the height manually.
- Once the height for the text object “Laser” is entered, the height movement for each toolpath is set and displayed. (Example: Magic 2mm/Laser 4mm).
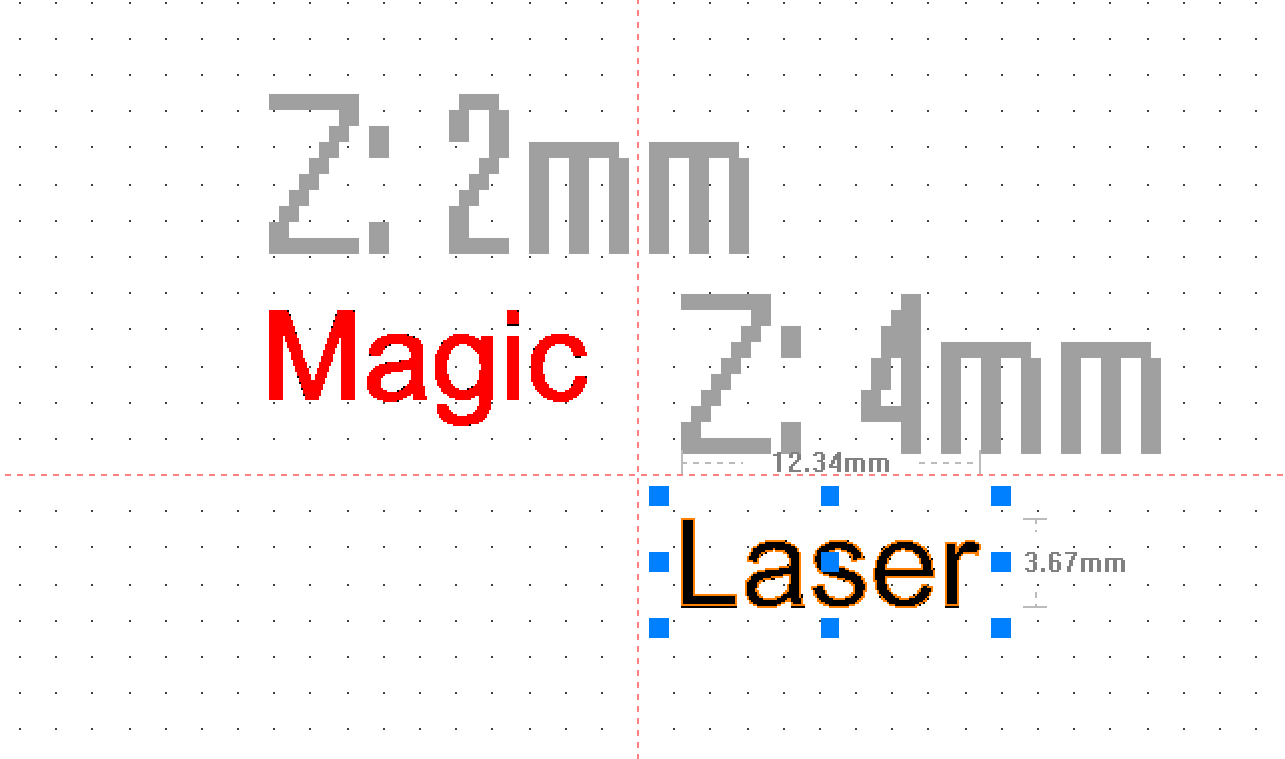
- When engraving begins, the laser height focus for the text object “Magic” moves 2mm up and 4mm up for the “Laser” text object.
12. Template Creation
Template is an image that corresponds to the material to be engraved by 1:1 ratio. Load a template similar to the shape of the material to be engraved then enter the text. This allows you to easily and conveniently position your text and determine its size. Templates such as circle, heart, square and diamond are available in the program, and users can freely add more templates. Templates can be created by using graphic programs like Illustrator, Photoshop and CorelDraw, or by loading images in SVG file format, jpeg, bmp, png, etc.
Creating template 1
1. Select [Menu] → [Template] → [Create Template from Image].
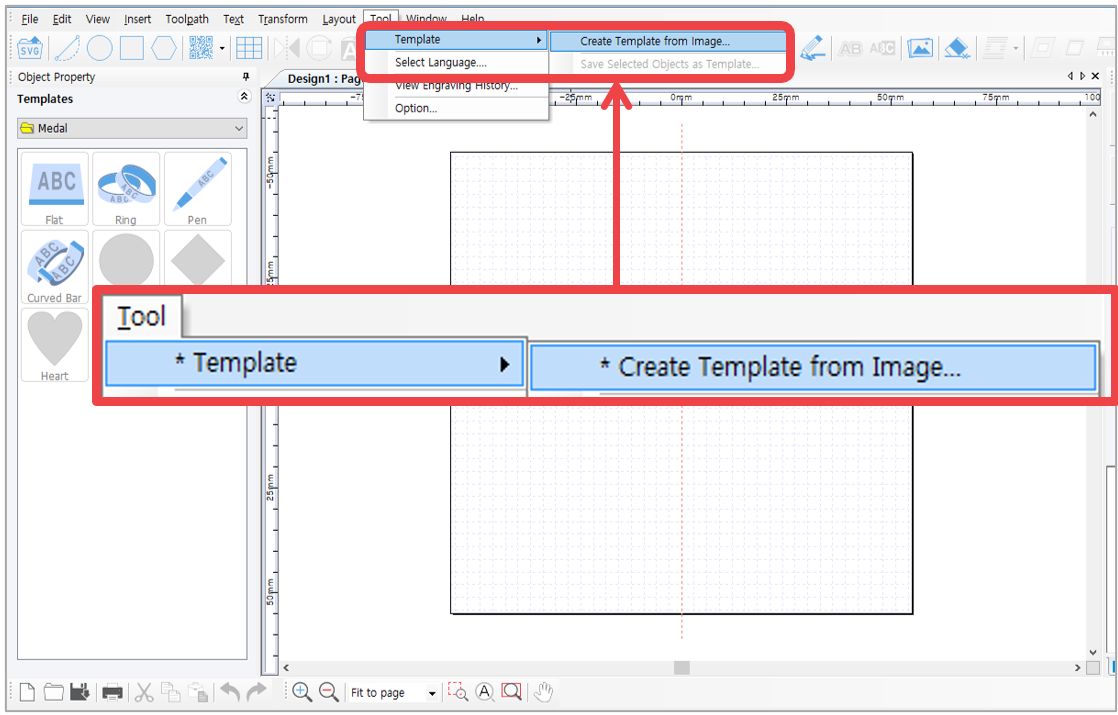
2. "Create Template from Image” window will appear.
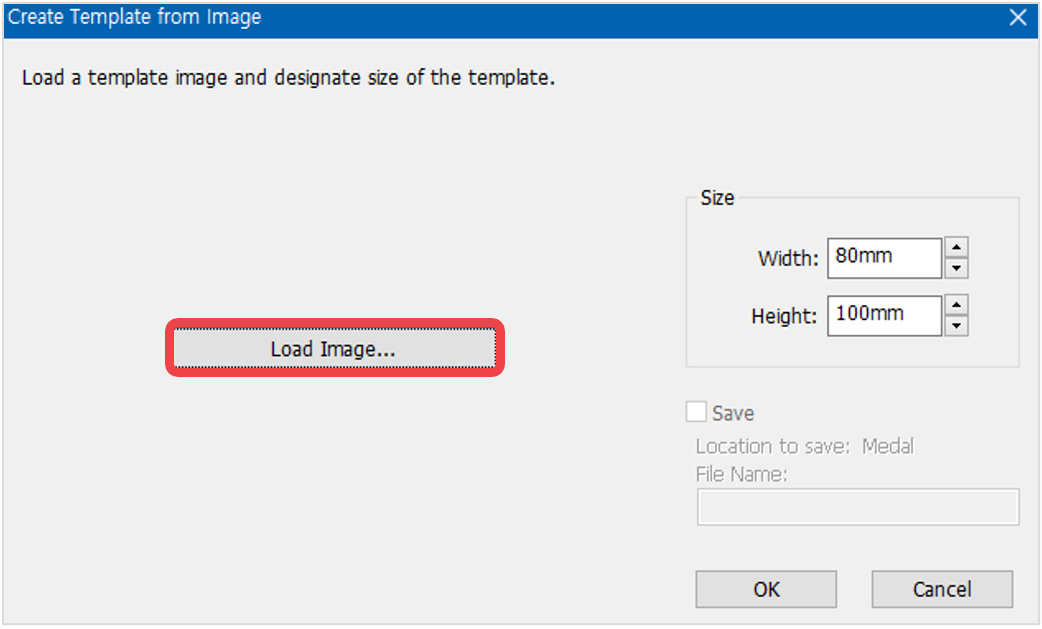
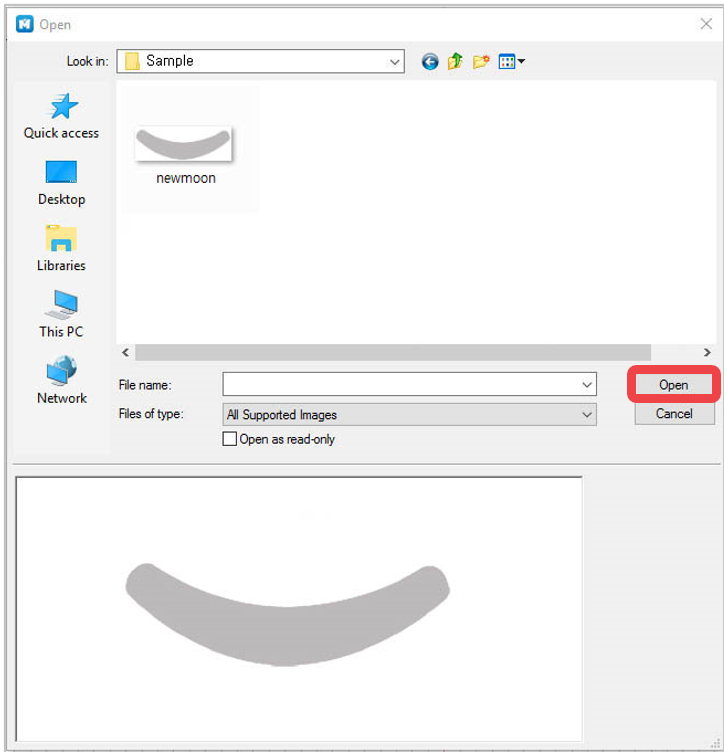
3. Select the image file (jpeg, bmp, png and etc.) from the “Open” window then click “Open” button.
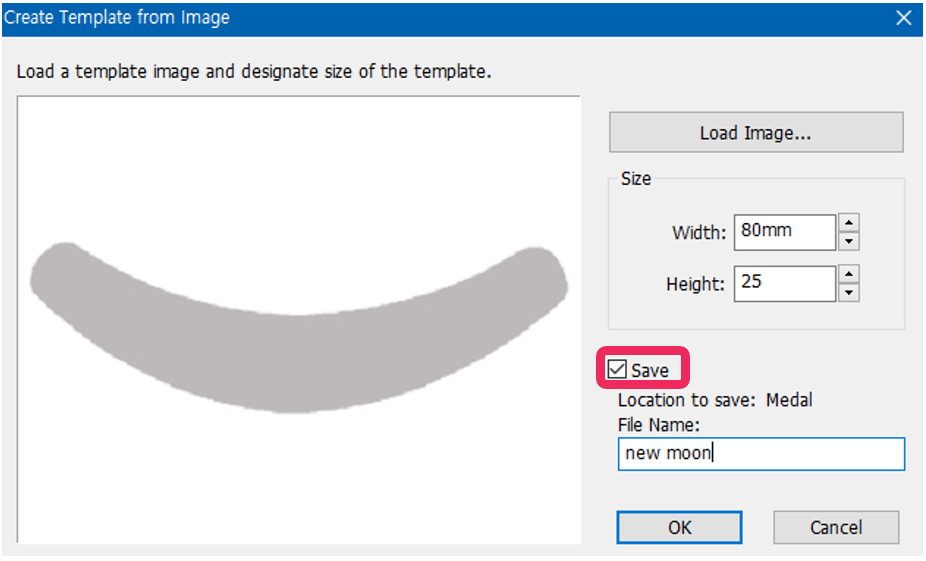
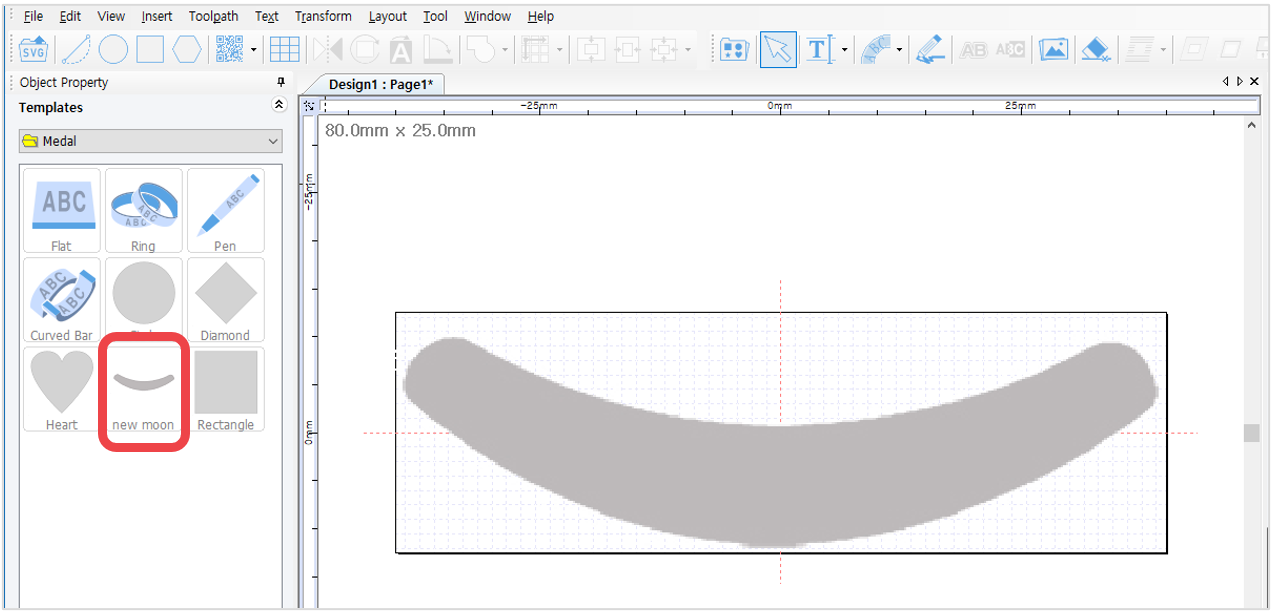
4. Enter the size of the template. Check “Save” to save the image as a template for later use then enter the file name. Click “OK” button to load the image as a template. The image will be saved as a template in the template library.
Creating template 2
1. Click [Image] button to open an image file.
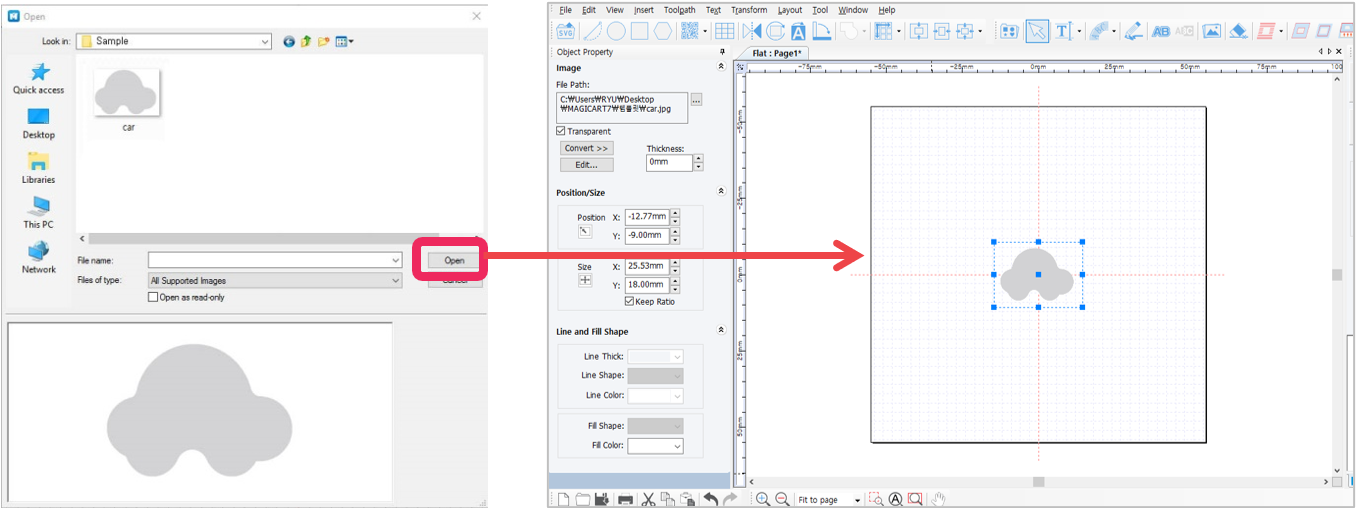
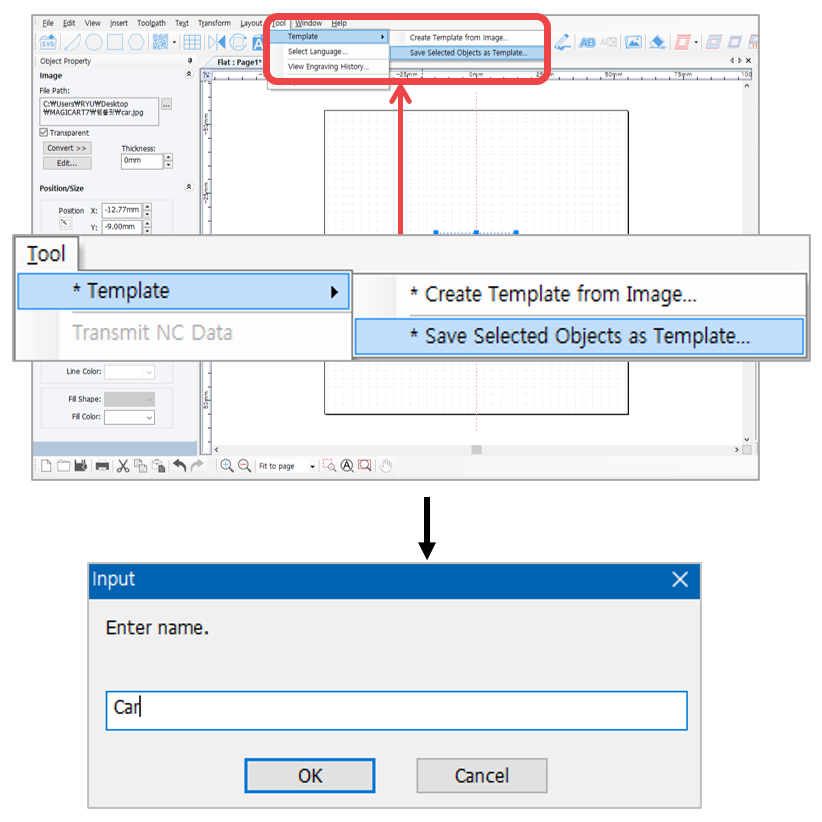
2. Select [Menu] → [Template] → [Save Selected Object as Template].
Enter a new template name in “Input” window then click “OK” button.
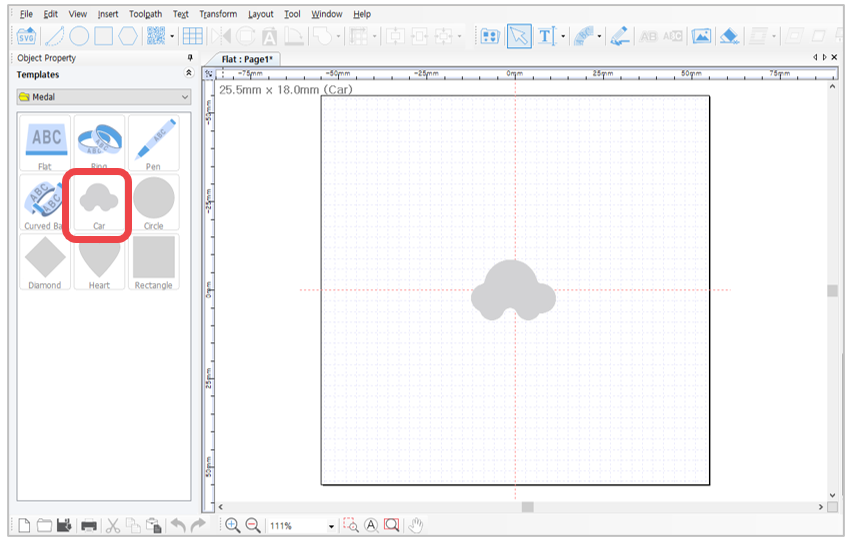
3. The saved template is added to the template library.
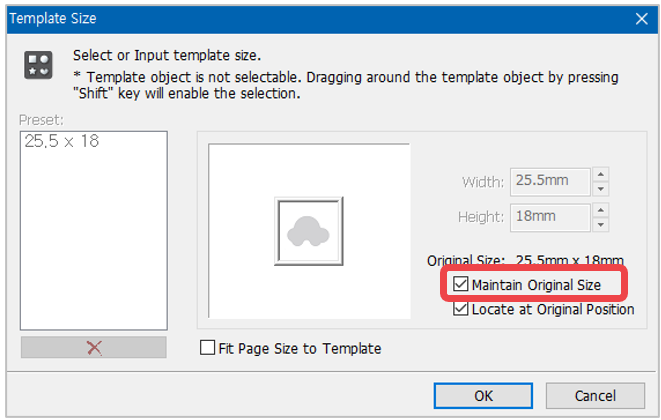
The saved template in the “Save Selected Object as Template” menu is saved based on the size designated on the screen. When loading a template, check “Maintain Original Size” so the template will be loaded based on the original size designated when the template was saved.
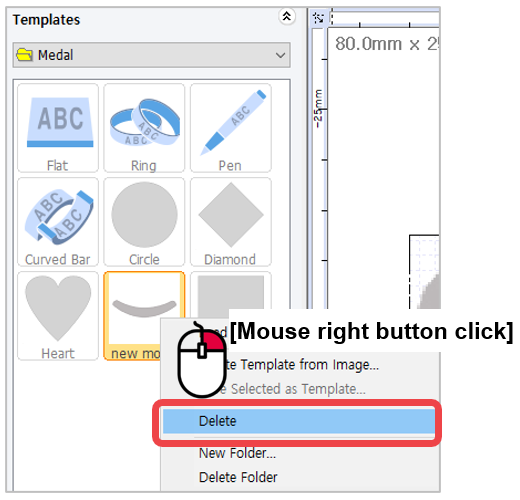
✽ Templates can be added or deleted. “Add” or “Delete” option can be selected by right-clicking in the template category window.
13. Saving as design sample
Edited texts, contents or designs can be saved as design samples for future use.
Saving as design sample 1
1. Edit contents and select the objects.
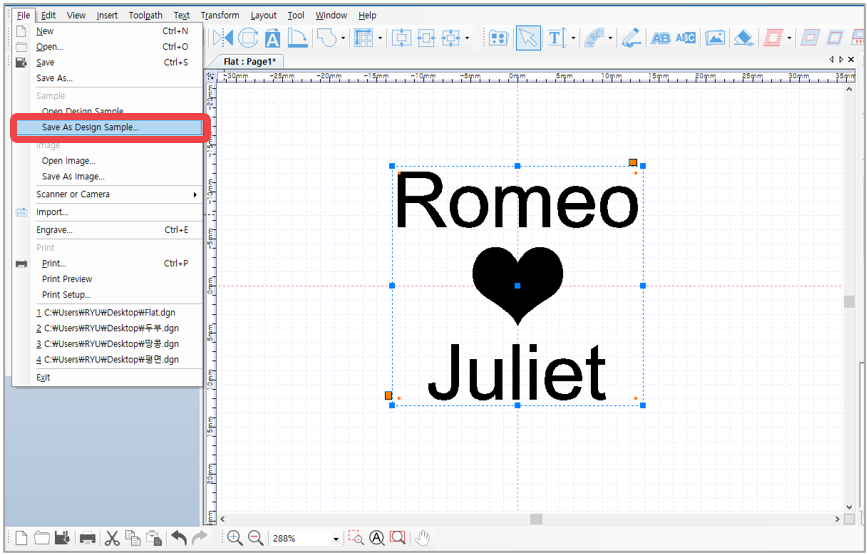
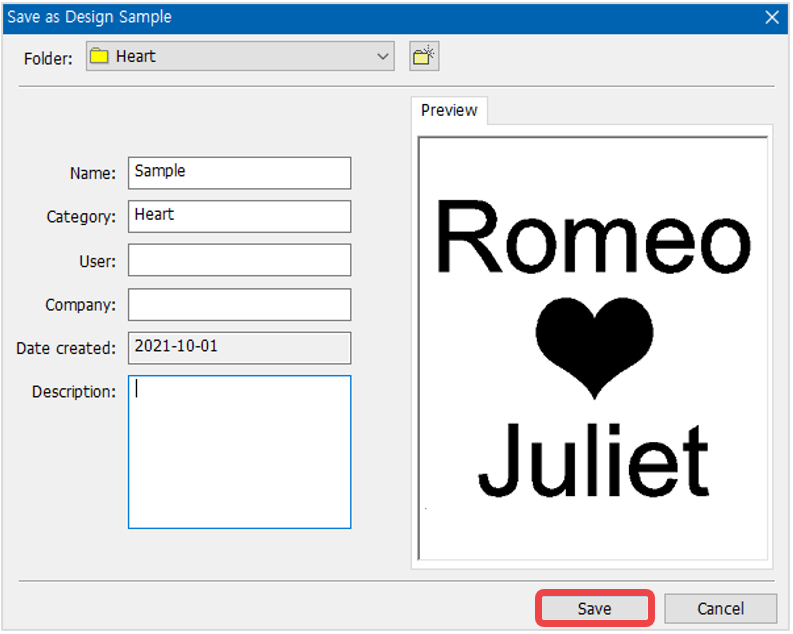
2. Click File [Menu] → [Save as Design Sample] then select a folder or create new folder.
Enter the name then click “Save.
Saving as design sample 2
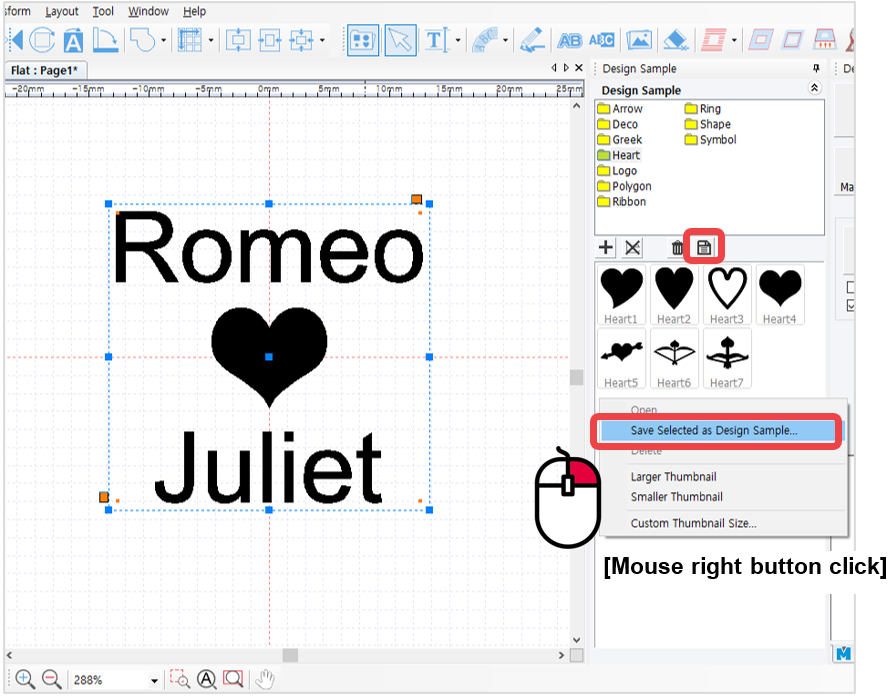
1. Select the objects then click [Design Sample] button. Select a folder from the design sample library window to save the created design.
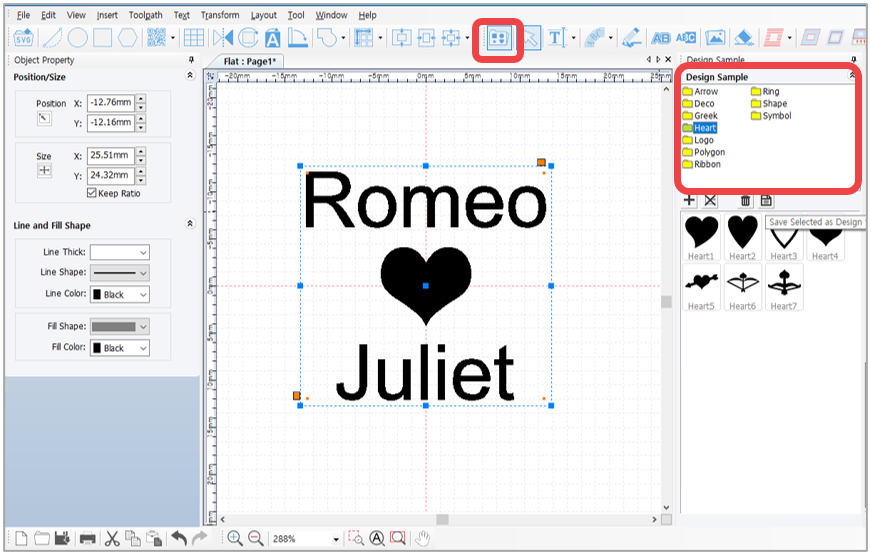
2. Click [Save selected image as sample] or right-click the design sample image then click “Save Selected as Design Sample” on the menu.
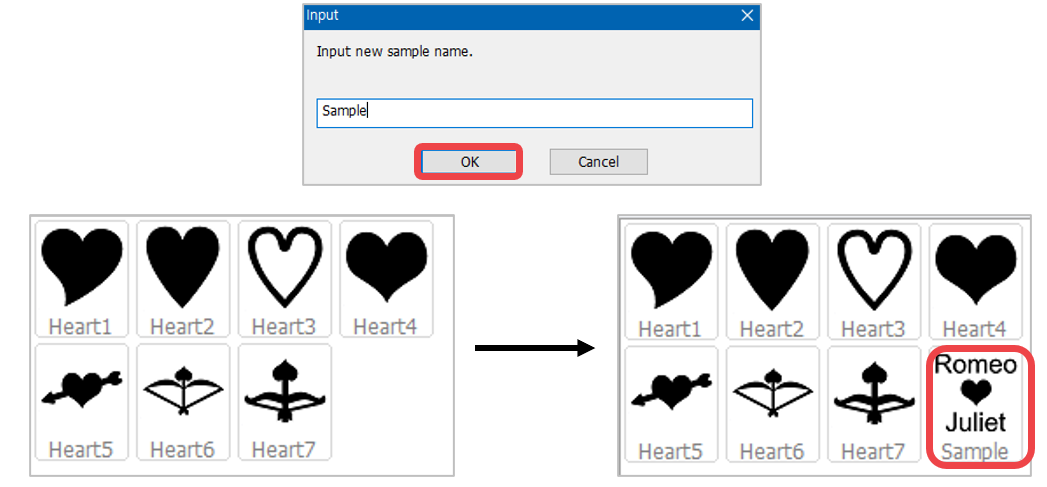
3. Enter the name of the design created then click “OK” button. The design will be saved in the design sample library.
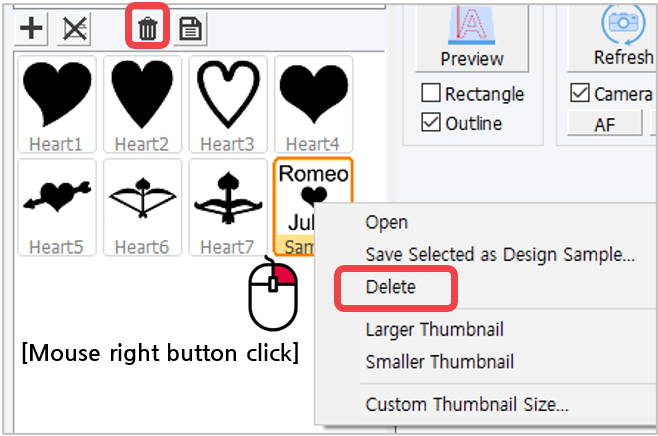
✽ Right-click in the design sample window to see more features. The design sample can be deleted by
right-clicking in the design sample window then select [Delete] on the menu.
14. Auto change of serial number
Use this function when changing numbers by certain unit.
1. Edit the font and size of text object with a number then press “Alt+N” key on a keyboard, or select [Menu] → [Text] → [Serial Number] → [Advance Serial Number] to change the number automatically.
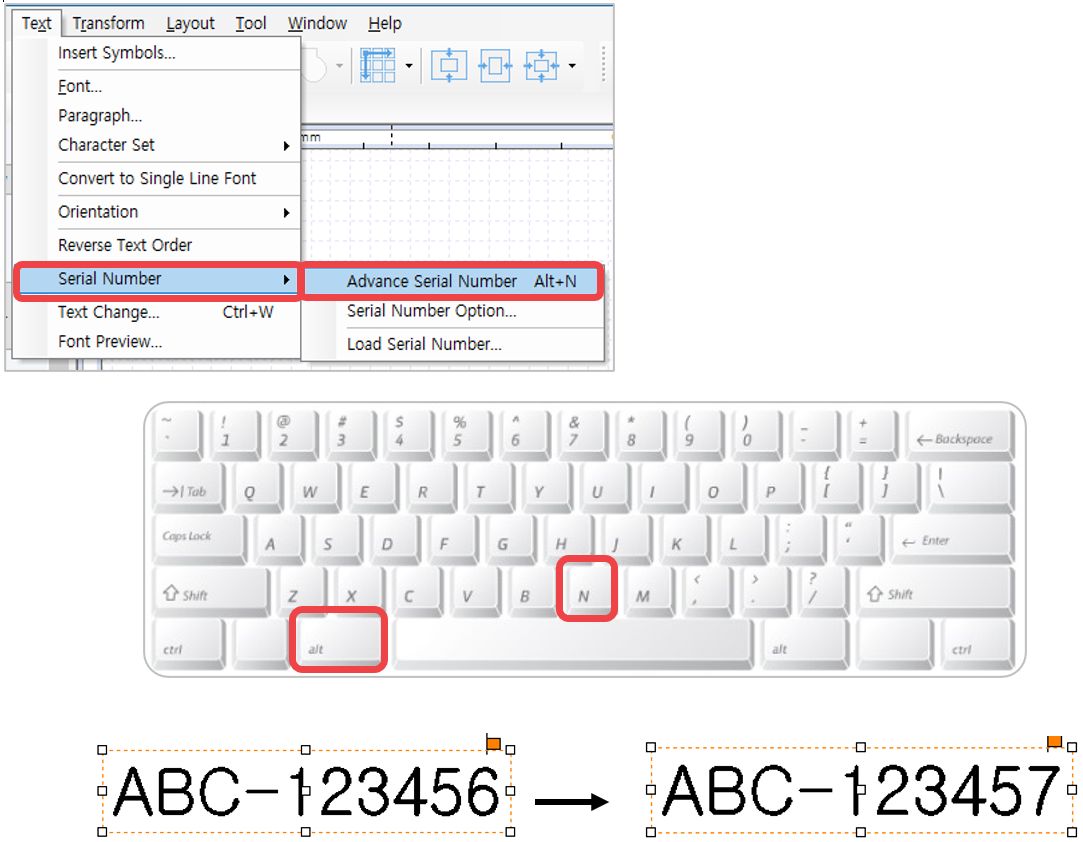
2. Select [Menu] → [Text] → [Serial Number] → [Serial Number Option] then enter a unit from the “Serial Number Auto Advancing Option” to change the serial number based on the assigned unit automatically.
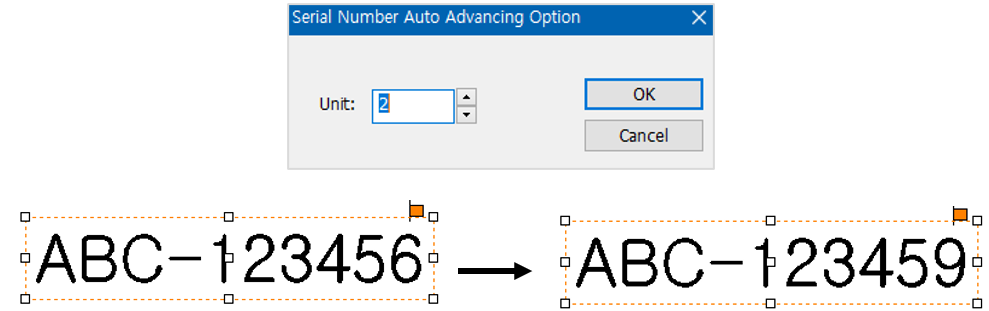
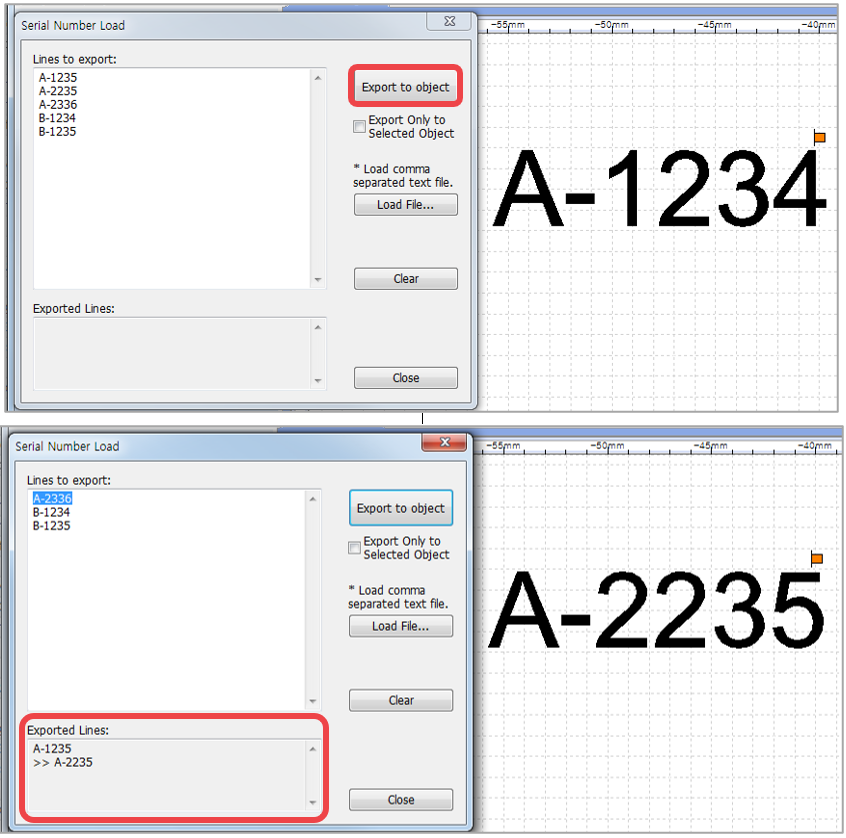
3. If the serial number is not consistent, select [Menu] → [Text] → [Serial Number] → [Load Serial Number].
Enter serial number in the “Lines to export” field or click “Load File” button to load from a file (.txt or .csv file format). Once the serial numbers are loaded, click “Export to object” button. The text on the selected text object is automatically changed, and the serial number is deleted from the list. The deleted numbers will be shown in the “Exported Lines.”
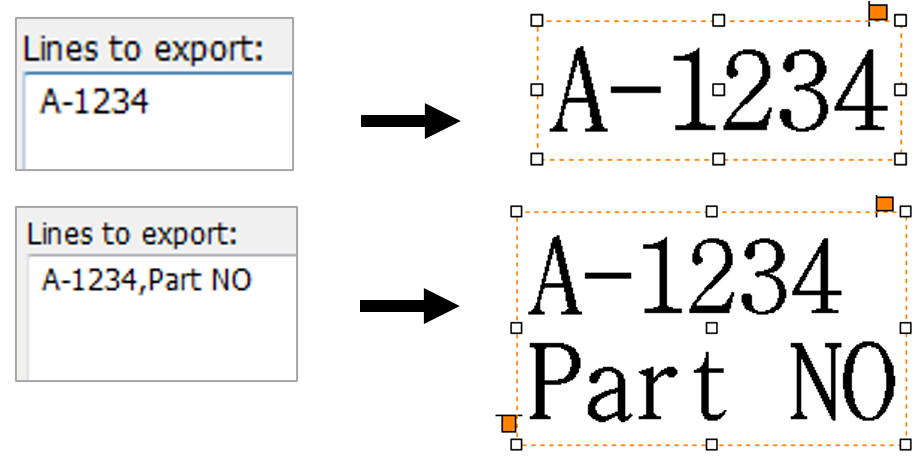
Serial numbers can be loaded from a file separated by a comma (.csv) or text file (.txt).
Each row of the file is recognized as one serial number, and the contents of each row separated by a comma are shown in the next line.
15. Loading and editing image
1) Loading an image
This program provides a function to load various types of image files. Supported image files are as follows.
| BMP | Windows or OS/2’s bitmap graphic file |
| GIF | CompuServe graphic file |
| JPG/JPEG | JPEG bitmap graphic file |
| PNG | Portable Network Graphics bitmap graphic file |
| PCX | Z Soft PC paintbrush bitmap file |
| TIF/TIFF | Tagged Image File Format bitmap file |
| WMF | Windows meta file |
Image file can be loaded through the following methods.
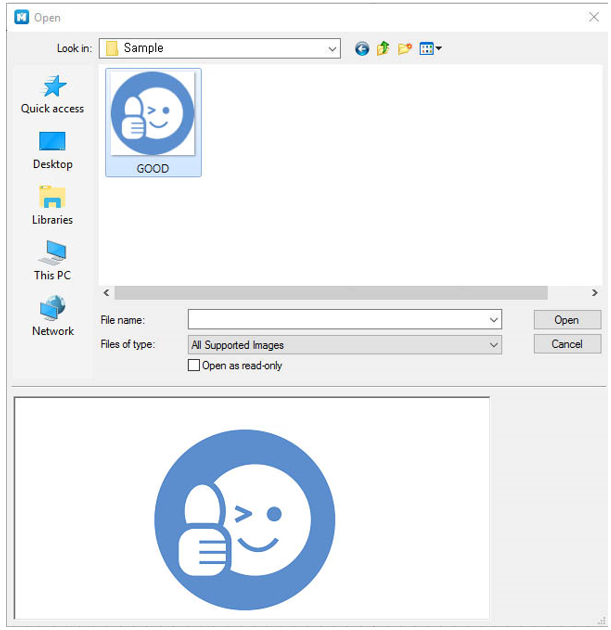
1. Select [Image] on the toolbar or select [Menu] → [Insert] → [Image].
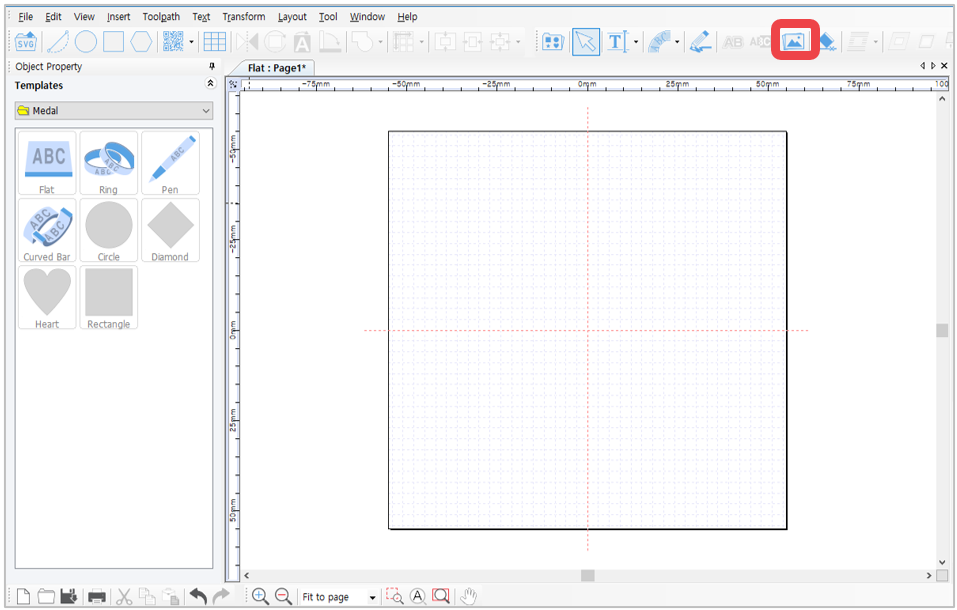
2. When “Open” window appears (as shown in the picture below), select the image to load then click “Open” button.
3. Drag the work area with the mouse to load the image according to desired size.
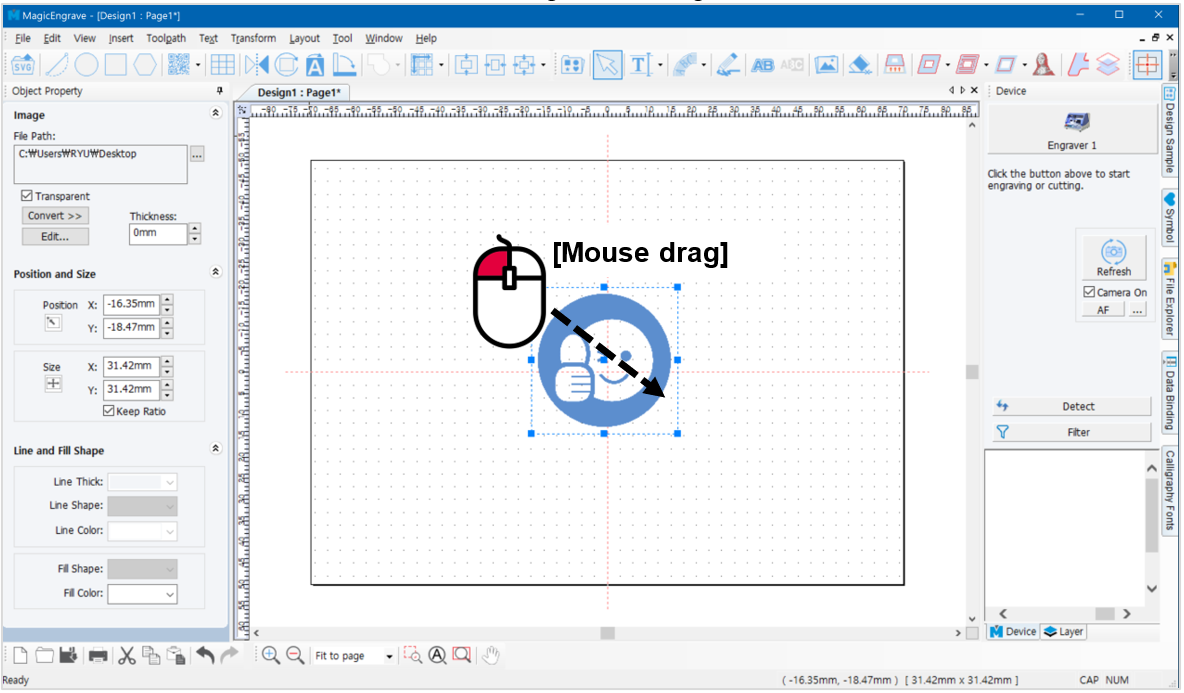
The machine can only engrave single-color images; not multi-color images. Multi-color images should be converted to single-color (1 bit) image.
2) Converting to single-color image
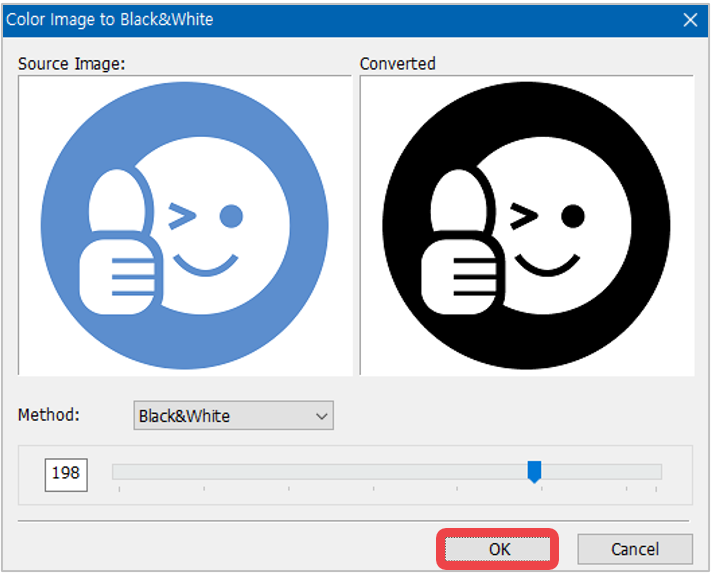
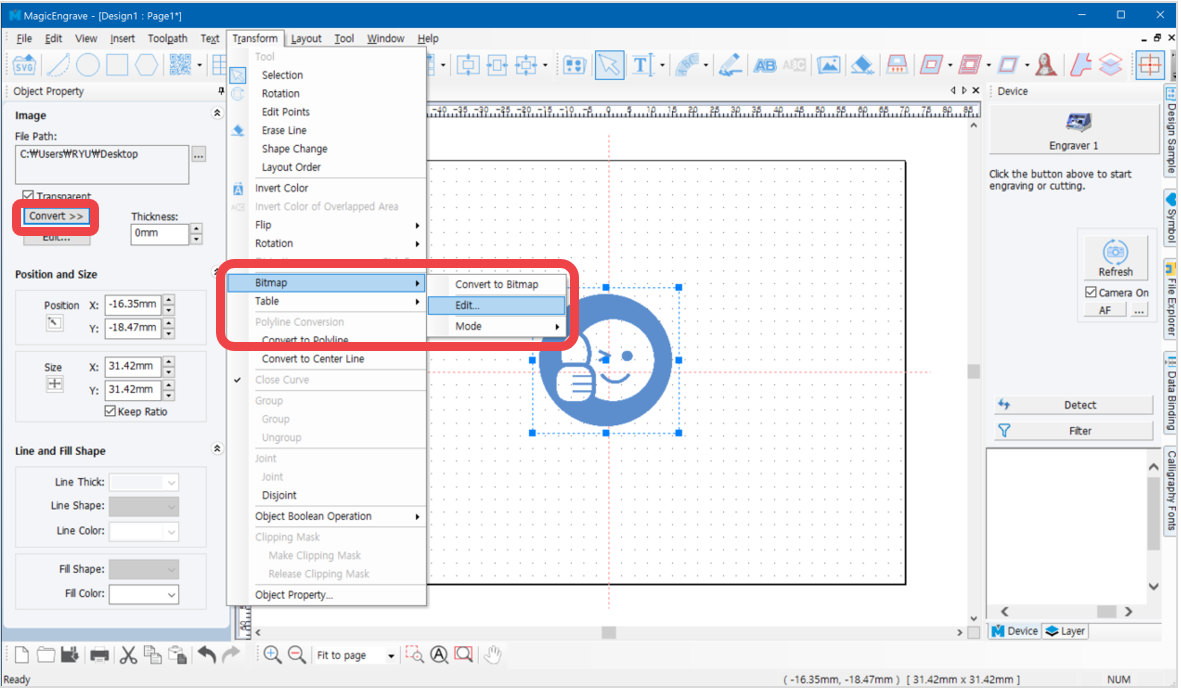
1. Select the image you want to convert. Click “Convert” button in the image object window then select “Monochrome (1bit).”
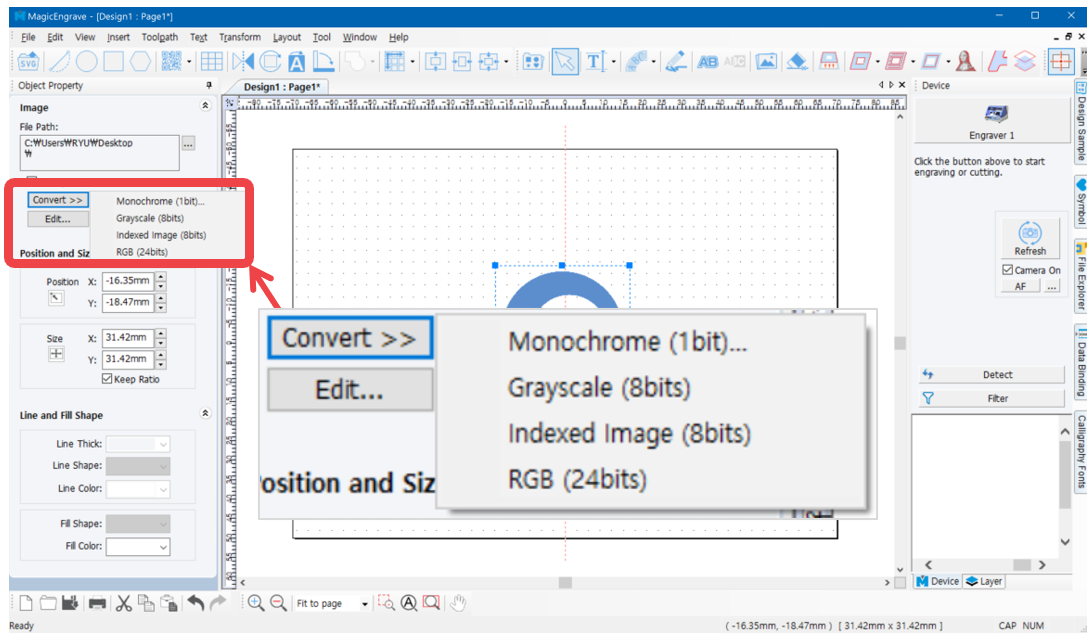
Or select the Transform menu → Bitmap → Mode → Monochrome (1bit).
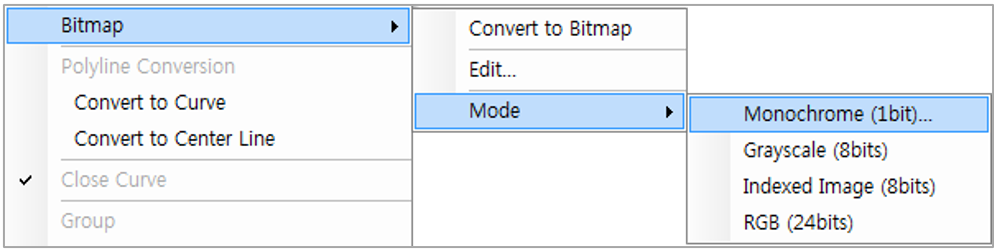
2. When “Color Image to Black & White” window appears, move the slider to adjust the level of color then click “OK” button.
3) Editing image
Loaded image can be edited via “Paint” program in Windows.
Select the image object to be edited then right-click to select “Edit” or, select [Menu] → [Transform] → [Bitmap] → [Edit].
Click [OK] to run Windows Paint program.
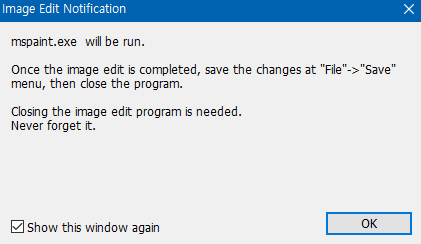
Then “Image Edit Notification” will appear.
Once editing is completed, click “Save” from Paint File menu then close the program to apply the changes.
16. Import a file SVG format
MagicEngrave supports vector graphic files in SVG format. If a design is created in programs like Illustrator or CorelDraw, the design can be loaded as long as it is saved as SVG file.
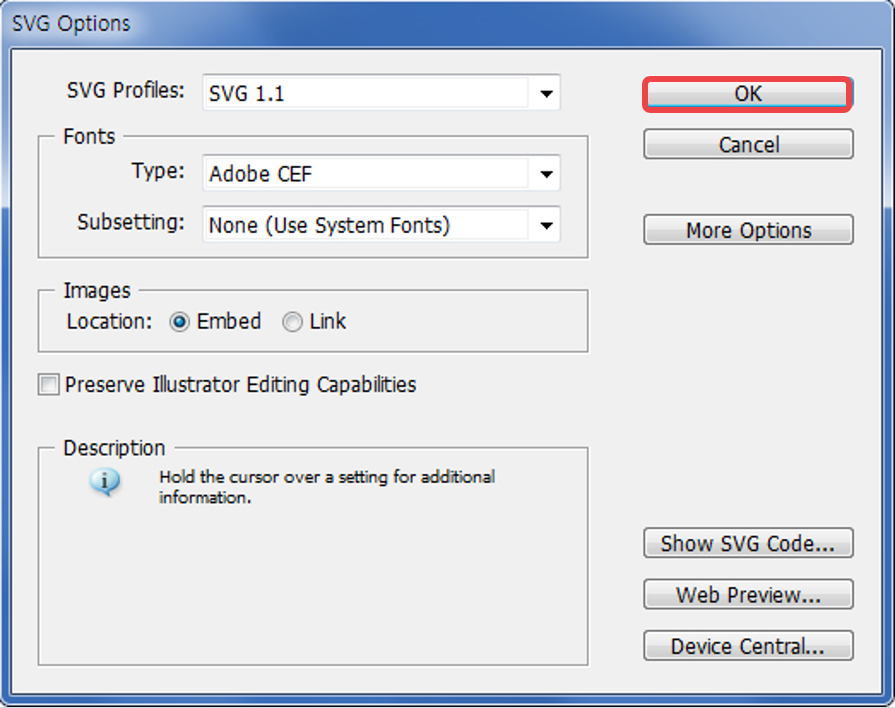
1. Select File menu → Save As from Illustrator program to save a file in SVG format.
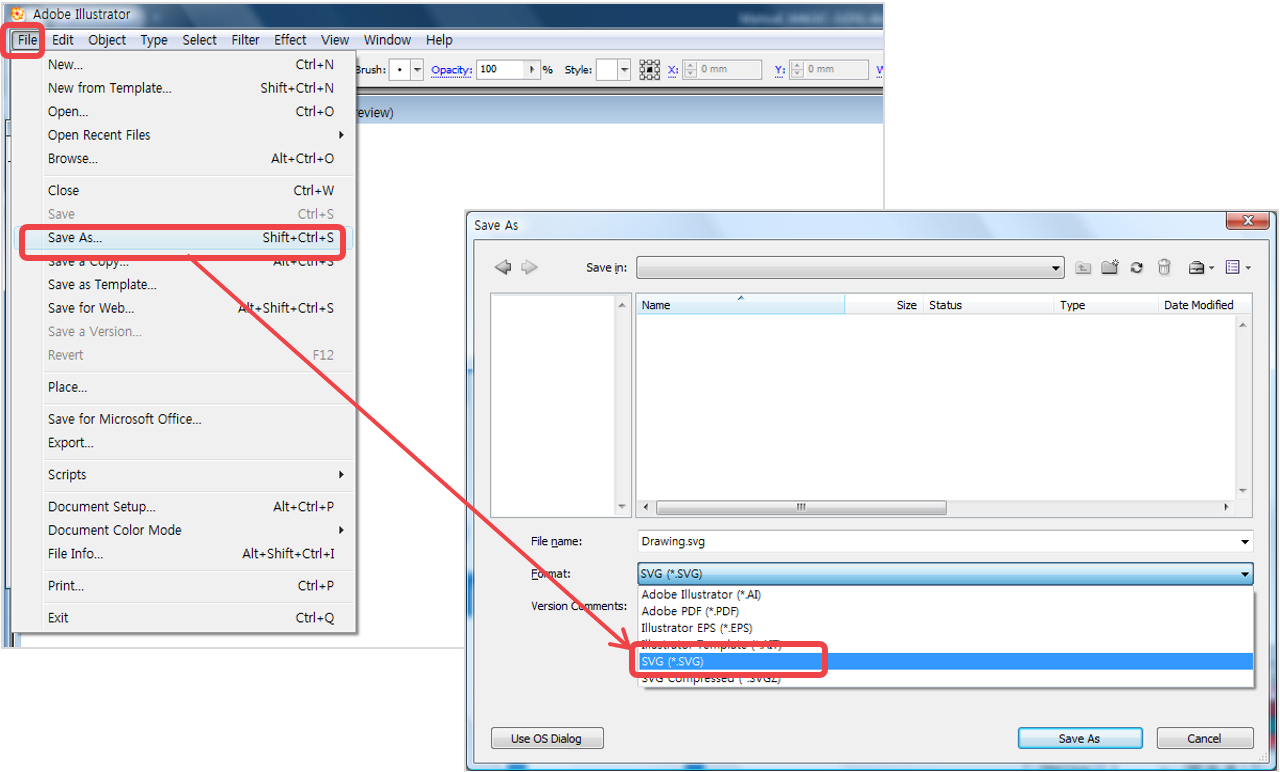
2. When SVG option window appears, click “OK” button to save changes.
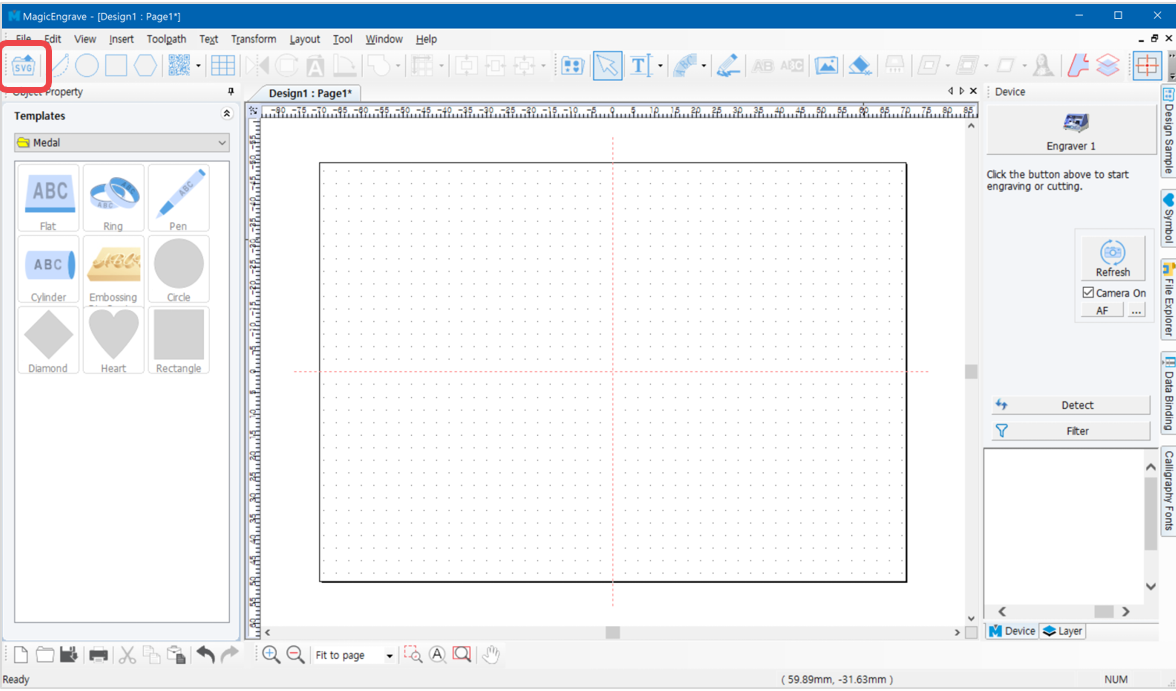
3. Click [SVG] button to load the SVG file.
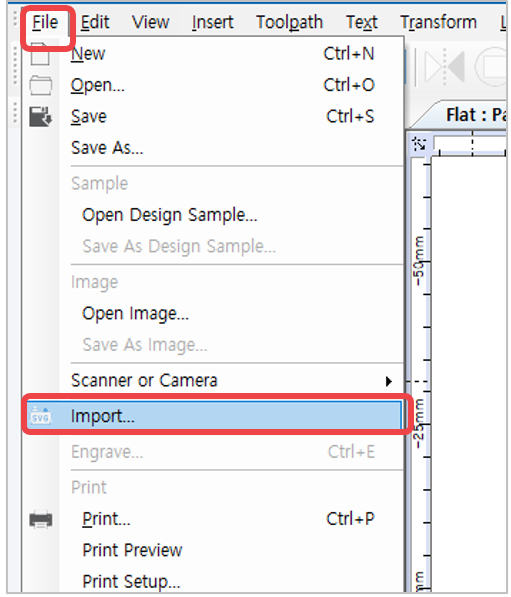
4. Or select [Menu] → [File] → [Import…] to import a file.
5. Once the file is imported, click the work area to display the image.